12 Important FAQ’s on VSTS Testing (Unit testing, load testing, automated testing, database testing and code coverage)
Introduction
VSTS 2010 download
What is Unit testing?
What are the different ways by which you can do unit testing with .NET?
Can we start with a simple NUNIT example?
How can we make NUNIT test cases data driven?
How can we do unit testing using VSTS test?
How can we create data driven unit test using VSTS Test?
How can we do automated testing using VSTS?
How can we make the automated test data driven in VSTS?
How can we do coverage testing using VSTS?
What are the different steps involved to execute performance test using VSTS?
I have heard about Database testing in VSTS, what does it do?
What is ordered testing?
Introduction
This article has 12 important FAQ’s which covers unit testing, automated testing, data driven test, load/ performance test, code coverage , database testing and ordered testing.I have collected around 400 FAQ questions and answers in Silverlight, Azure, VSTS, WCF, WPF, WWF, SharePoint, Design Patterns, UML etc. Feel free to download these FAQ PDF’s from my site http://www.questpond.com/
VSTS 2010 download
This article uses VSTS heavily so in case you do not have the BETA download the same from:-http://www.microsoft.com/downloads/details.aspx?FamilyID=255fc5f1-15af-4fe7-be4d-263a2621144b&displaylang=en
What is Unit testing?
Unit testing is validation and verification methodology where the developers test the individual units of source code.Some key points to be remembered from: -
- A unit is the smallest part in the application which can be tested. So it can be either a method. Function or class.
- These tests are conducted during development.
- Unit test belongs to the white box testing category.
What are the different ways by which you can do unit testing with .NET?
There are 2 primary / accepted ways of doing unit testing:-- NUNIT
- Visual studio team edition test system
Can we start with a simple NUNIT example?
Ok so let’s say we want to do unit testing for a simple class ‘clsInvoiceCalculation’ shown below. This class calculates total cost by taking per product cost and number of products as input.public class clsInvoiceCalculation
{
public int CalculateCost(int intPerProductCost, int intNumberOfProducts)
{
return intPerProductCost * intNumberOfProducts;
}
}
Let’s say we want to execute the below test case on the above class using NUNIT.

Step 1:- The first step is to download to the NUNIT software from
http://nunit.org/index.php?p=download
Step 2:- Create a new C# class project and add reference to “C:\Program Files\NUnit 2.5.2\bin\net-2.0\framework\nunit.framework.dll”. We also need to add reference to the class project which we are testing i.e. the invoice project.

Step 3:- Add reference to the NUNIT and your invoice project in your code.
using NUnit.Framework;
using Invoice;
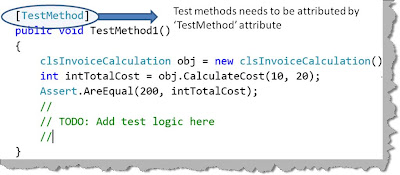
Step 4:- We need to create a simple class with ‘TestFixture’ as attribute. We then to create a method attributed with ‘Test’ which will have our test.

You can see in the above figure how the ‘TestInvoiceCalculation’ method creates a object of ‘clsInvoiceCalculation’ , passes the values and checks if the returned values has the expected results. ‘Assert’ command is used to check if the expected output and the results return match.

Step 5:- Once we are finished with our test case we need to compile the same to create a DLL. Once the DLL compilation is done go to program files – nunit and click on nunit. Now the nunit user interface will open. Click on file – open project and select your test DLL.
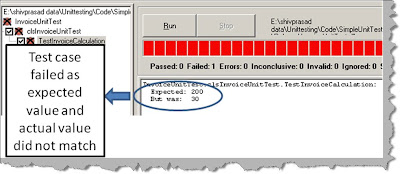
Once you select your DLL you will get a screen as shown below. On the right hand side you can see your test class with test function which has the test case. Check the test function and hit run. Now if the test case passes you will see a full green color or else you will see a red color with details of why the test case fails.

Screenshot when the test case fails.
How can we make NUNIT test cases data driven?
In the previous questions we had hardcoded the test data in the NUNIT test case itself. But in real time you would like to have test data inputs coming from a XML file or a database, in other words you would like to create data driven test cases. In order to create data driven in NUNIT we can attribute the unit test method with ‘TestCaseSource’ attribute as shown in the below figure. In ‘TestCaseSource’ we need to provide the function which will return the test case data, in this case it is ‘TestCases’.
Below is the code snippet which provides dynamic data to unit test method. The function which is providing the dynamic data should return ‘IEnumerable’. NUNIT provides something called as ‘TestCaseData’ class. This class defines the test case data for NUNIT. The class provides ways by which you can specify input and the expected output from the test case.
Finally to return test case by test case we need to use ‘yield’ keyword with for each. You can see the below code snippet to understand how yield works.

How can we do unit testing using VSTS test?
If you do not have VSTS get the beta @http://www.microsoft.com/downloads/details.aspx?FamilyID=255fc5f1-15af-4fe7-be4d-263a2621144b&displaylang=en
In order to do unit testing using VSTS right click on the visual studio solution explorer and select add new project. In the test project right click and select add new test you should be popped with a dialog box as shown in the below figure. From the dialog box select ‘Basic Unit test’.

In order to create a function which will execute our unit test you need to attribute the function with “[TestMethod]”. If you remember in Nunit it was ‘[Test]’. The assert function does not change.
Once you have done the unit testing coding compile the same, click on test, run and select ‘Tests in the current context”.

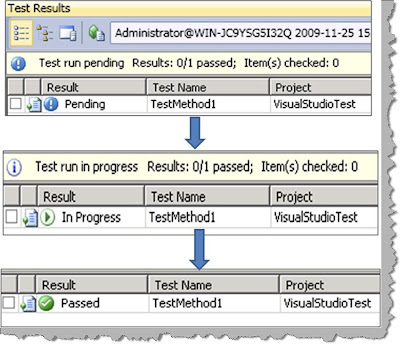
Once you do the previous test, the test starts running from pending to in progress and finally showing the results.
In case your test fails and you would like to see detail results of the same double click on the test to see a detailed result as shown below. The below results shows that the test failed because it was expecting “200” as the output and it got “30”.

How can we create data driven unit test using VSTS Test?
Creating data driven unit test is pretty simple in VSTS. First create a simple table with test data values. For instance you can see in the below figure we have created a table with 3 fields i.e. 2 input fields and 1 expected value. To consume this table apply ‘DataSource’ attribute with a proper database connection string as shown in the below figure.To get field data from the table we can use the ‘DataRow’ with index.
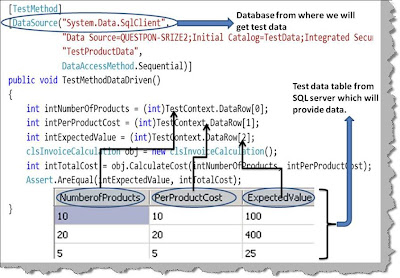
We have 3 test cases in the table, so when we executed the above test’s we got the below test results in our visual studio IDE result window.

How can we do automated testing using VSTS?
In order to do automate testing in VSTS we need use the ‘Web test’ template. So click on add new test and select ‘Web test’.
Once you have selected web test browser will open with a record, pause and stop button as shown in the below figure. Once you start posting and requesting, the URL recorder starts recording every request and response as shown in the below figure. On the right you can see how the recorder has recorded all the get and posts.

Below is a snapshot of simple login screen which is recorded. There are two requests, the first request is for the login page and the second request is when you post the login page with userid and password. You can see the values i.e. ‘Admin’ and ‘Admin’ in userid and password textboxes.

We will also need to define in which conditions the test will pass. Now right click on the second post and select ‘Add validation rule’ as shown in the below figure.

Select the rule saying if anywhere on the browser response we found ‘Logged in’ text that means that the test is passed.

If you run the test you will get the executed values with the test specifying it’s a pass or fail.

How can we make the automated test data driven in VSTS?
Once you have created the web test, right click on the web test and click add data source as shown in the below figure.
Once you have added the data source you can then specify the database fields as inputs to the text boxes as shown in the below figure.

We need to perform one more step to ensure that the data driven test runs fine. Right click on the testrunconfig file and select one per data row as shown in the next figure.


Once you are done you can run the test and see how VSTS picks up row by row test cases and executes the test. You can see in the below figure the first test case has failed while the second test case has passed.

How can we do coverage testing using VSTS?
Code coverage is a 3 steps process as shown below. The first step is to
enable code coverage. So right click on the ‘.testrunconfig’ file in the
solution explorer as shown in the below figure.

The next step is to select the assembly / DLL which we want to monitor for
code coverage, below is the figure which shows the same.

Once you run the test, right click on the test results and select code
coverage results. You will be shown a details result as shown below where you
can see which part of your application is covered and tested.


