Sunday, October 25, 2015

Immutable objects in C#

Introduction


There is saying which goes “MAKE THE POT WHILE THE MUD IS WET”. Once Mud becomes dry it cannot be changed. Immutable objects walks on the similar lines. Once the object is created it cannot be modified by anyway.

What are immutable objects?

Immutable objectsare objects which once loaded cannot be changed / modified by anyway external or internal.

Where are immutable objects used?

If I put in one line Immutable objects are used for data WHICH IS STATIC. Below are some of the instances of the same.
• Master data: - One of the biggest uses of immutable objects is to load master data. Master data like country,currency , region etc rarely change. So we would like to load master data once in the memory and then we do not want it to be modified.

• Configuration data: - All application needs configuration data. In Microsoft world we normally store these configuration data in to Web.config or App.config file. Such kind of data is represented by objects and these data once loaded in the application memory will not change.Its again a good practice to make these kind of configuration data objects as immutable.

• Singleton objects: -In applications we normally create singleton objects for shared static data. So if the shared data is not changing it’s aawesome candidate for immutable objects. In case you are new to Singleton pattern please refer this article Singleton Pattern in C#
 

How can we create immutable objects in C#?

Immutable objects can be created only from immutable classes. To create an immutable class is a three step process :-

• Step 1:- Remove the setters of the class only have getters.
The first step towards creating an immutable class is to remove the setters. As we said values of a immutable class cannot be modified EXTERNALLY or INTERNALLY. So by removing the getters any client who creates the object of this class cannot modify the data once loaded.


• Step 2:- Provide parameters via constructor.
We have removed the getters so there is no way to load data in to the class. So to provide data we need to create constructors with parameters via which we can pass data to the object. Below is the modified code for the same.


• Step 3 :- Make the variables of the property READONLY

As we said in the previous definition immutableobjects cannot be modified by ANYWAY once the data is loaded. I will go one step further and say it cannot be modified EXTERNALLY by client or INTERNALLY by the class code himself.
 

But if you see our currency class the variables can be modified after the object creation. In other words see the below class code. We have created a method in the class called as “SomeLogic”. This method is able to successfully modify the variables after the object has been created.

So the solution for the above to make the variables “READONLY”. Below is the currency class modified where the property variables are made readonly.Readonly variables can be only initialized in the constructor and later they cannot be modified.

Hope you enjoyed this short note on Immutable objects. Immutable objects is a design pattern which was first officially discussed in Java concurrency in practice book. In case you are interested to learn design pattern I would suggest creating a full blown project and starting implementing design pattern in the same.
 

You can start from the below youtube video in which I have demonstrated design pattern with a full blown project.

Monday, September 28, 2015

Out and REF in C#

Out and REF are one of those most confused topics in C#. In this small article we will try to simplify the same.

There are three important points to remember about OUT and REFand once you understand these three points you would never have problem with OUT and REF.

Point number 1:- By default variables are passed BYVAL to methods and functions. Out and Ref helps to pass variable BY REF (By reference) .
Let us try to understand the above point. Consider the below code snapshot where we have the “Main” method and its calling “SomeFunction” method and its passing “OutSideVar” variable to “SomeFunction”.

Now by default only value of “OutSideVar” will be copied to the method so any changes in “InsideVar” variable change will have no affect outside. You can see after the function call “OutSideVar” still has value “20”. In other words by default the values are passed BY VAL.


So if we summarize in a normal situation data is passed BY VAL , from the caller to callee. Any modifications done in the callee will not be reflected to the caller.


Point number 2:- When we mark parameters with REF, reference of the variable is passed to the function / method and any modification in that method and function will affect to the outside variable.
In the below code you can see we have marked variablesusing the REF keyword and you can see how the changes within the function modifies the outside variable also. This is happening because now variable is passed by reference.


Summarizing in this scenario DATA + REFERENCE is passed to the function and any modification inside the function affects the outside variable.


Point number 3:- When we mark parameters with OUT, ONLY reference of the variable is passed to the function or method and NOT DATA.Any modification in that method and function will affect outside variable as well. Also its compulsory to initialize the variable.

When we mark the variable as OUT only reference is passed no data is passed to the function. For instance in the below code the value “20” from “OutSideVar” is not sent to the function. But any modification in variable from the inside function is reflected to the outside variable.


Summarizing, you can term this also has one way but it’s one way from the callee to the caller and any data sent from the caller is discarded.


So summarizing what we have learnt:-
  • Out and Ref help to pass variables by reference.
  • In REF with reference data is also passed from caller to the callee and vice versa. It’s two way i.e. from caller to the callee and vice-versa.
  • In OUT only reference is passed and modified data from the callee is passed to the caller variable. This is one way from the callee to the caller.
  • In OUT if data is passed from the caller function it is discarded and the variable has to be initialized inside the function.
Below image summarizes what we talked in the above article.


Below is a nice C# video which explain Out Vs Ref.

Thursday, September 3, 2015

C# Out VS Ref

Lot of times we come across C# fundamentals which are bit confusing and one such concept which is discussed a lot is Out VS Ref. So this small blogpost would make a full attempt to simplify the OUT vs REF concept.

Out and Ref are keywords which you need to worry when you want to get MULTIPLE values from a function. It helps you to define how data would be passed from caller to the callee and vice versa.

For example take the case of a simple “Add” function below. It has only one output so with just a single return call things work perfectly well.

static int Add(int num1,int num2)
{
      return num1 + num2;
}

But now lets do something more complicated. In the below function we need to get 4 outputs or putting in other words we have four OUT parameter values. This is where OUT keyword comes to help.

static int Maths(int num1,int num2)
{
int Add = num1 + num2;
int Sub = num1 - num2;
int Divide = num1 / num2;
int Multi = num1 * num2;
}

When you use OUT keyword you are indicating that you are expecting output from the function but you do not intend to pass data to the function. It is just ONE WAY :- so the Caller get data from the Callee.

So to indicate this one-way data transfer you need to use the OUT keyword on the Callee as shown below.

static void Maths(int num1,
int num2,
out int Add,
out int Sub,
out int Multi,
out int Div)
{
             Add = num1 + num2;
             Sub = num1 - num2;
            Div = num1 / num2;
            Multi = num1 * num2;
}

The caller also needs to provide the variables in which the data will be received and the caller needs to mark the variables with OUT keyword while making the call. In short both the caller and callee will have the OUT keyword indicating that data will come out of these variables.

int Add,Sub,Multi,Div=0;
Maths(10, 10,out Add,
      out Sub,
      out Multi,
out Div);

Note :-
If you are specifying a variable as OUT and also trying to set data while calling, the passed DATA WILL BE DISCARDED inside the method / function.

Now let us take a scenario of a swapping number function code as shown below. In this scenario we want that the function should take “num1” and “num2” values and update the swapped values in the same two variables.

static void Swap(int num1, int num2)
{
            num1 = num1 + num2;
            num2 = num1 - num2;
            num1 = num1 - num2;
}

For that we need use the REF keyword as shown below.

static void Swap(ref int num1,ref int num2)
{
            num1 = num1 + num2;
            num2 = num1 - num2;
            num1 = num1 - num2;
}

From the caller side we need to again use the REF keyword as shown below.

int num1 = 10;
int num2 = 20;
Swap(ref num1,ref  num2);

In REF the data will be passed to the function / method and when the callee method updates the variables it will update the caller variables as well.


Below is a visual diagram which explains the difference between REF and OUT. In REF Parameter + Data is passed while in OUT only parameter is passed and data is set from the callee.


So the conclusion is as follows of the above post is as follows:-
  • It should be used only when we are expecting multiple outputs from a function or a method.
  • REF and OUT are keywordswhich dictate how data is passed from caller to callee and vice versa.
REF
OUT
Data passes two way. From caller to callee and vice-versa. Data passes only one way from callee to caller. Caller data if passed is rejected.

Below is one such concept which is not known to many developers, the C# yield keyword. Below is a simple video of the same which explains the same in a practical manner.

Thursday, May 28, 2015

Preventing XSS Attacks in ASP.NET MVC using ValidateInput and AllowHTML

Introduction
What is XSS?
How can we prevent the same in MVC?
What is the difference between “ValidateInput” and “AllowHTML” in MVC ?

Introduction

In this blog we will try to understand how we can prevent and fine tune XSS(Cross Site Security) security attacks in ASP.NET MVC.

What is XSS?

XSS(Cross Site Security) is a security attack where the attacker injects malicious code while doing data entry. This code can be a javascript, vbscript or any other scripting code. Once the code is injected in end user’s browser. This code can run and gain access to cookies,sessions, local files and so on.
For instance below is a simple product data entry form. You can see in the product description how the attacker has injected a javascript code.

Once we click submit you can see the JavaScript code actually running.

How can we prevent the same in MVC?

In MVC by default XSS attack is validated. So if any one tries to post javascript or HTML code he lands with the below error.

What is the difference between “ValidateInput” and “AllowHTML” in MVC?

As said in the previous question in ASP.NET MVC we are not allowed to post scripts and HTML code by default. But consider the below situation where we want HTML to be written and submitted.
The other scenario where we need HTML to be posted is HTML editors. So there is always a need now and then to post HTML to the server.

So for those kinds of scenarios where we want HTML to be posted we can decorate the action with “ValidateInput” set to false.This by passes the HTML and Script tag checks for that action.
You can see in the below code we have requested the MVC framework to NOT VALIDATE the input to the action.
[ValidateInput(false)]
public ActionResult PostProduct(Product obj)
{
return View(obj);
} 
But the above solution is not proper and neat. It opens a complete Pandora box of security issues. In this product screen scenario we just HTML in product description and not in product name.
But because we have now decorated validate false at the action level , you can also write HTML in product name field as well. We would love to have more finer control on the field level rather than making the complete action naked.

That’s where “AllowHTML” comes to help. You can see in the below code we have just decorated the “ProductDescription” property .
public class Product
{
        public string ProductName { get; set; }
        [AllowHtml]
        public string ProductDescription { get; set; }
}
And from the action we have removed “ValidateInput” attribute.
public ActionResult PostProduct(Product obj)
{
            return View(obj);
}
If you now try to post HTML in product name field you will get the below error saying you cannot post HTML tags in product name field.

So the difference between ValidateInput and AllowHTML is the granularity of preventing XSS attacks.
Hope you have enjoyed this blog.
Also the other dead attack which happens on a MVC website is CSRF, see the below facebook video which demonstrates how CSRF attack can be prevented.

Monday, May 25, 2015

What is CSRF attack and how can we prevent the same in MVC?

CSRF (Cross site request forgery) is a method of attacking a website where the attacker imitates a.k.a forges as a trusted source and sends data to the site. Genuine site processes the information innocently thinking that data is coming from a trusted source.

For example conside the below screen of a online bank. End user’s uses this screen to transfer money.

Below is a forged site created by an attacker which looks a game site from outside, but internally it hits the bank site for money transfer.

The internal HTML of the forged site has those hidden fields which have the account number and amount to do money transfer.

Now let’s say the user has logged in to the genuine bank site and the attacker sent this forged game link to his email. The end user thinking that it’s a game site clicks on the “Play the Ultimate Game” button and internally the malicious code does the money transfer process.

So a proper solution to this issue can be solved by using tokens: -

  • End user browses to the screen of the money transfer. Before the screen is served server injects a secret token inside the HTML screen in form a hidden field.
  • Now hence forth when the end user sends request back he has to always send the secret token. This token is validated on the server.

Implementing token is a two-step process in MVC: -

First apply “ValidateAntiForgeryToken” attribute on the action.

[ValidateAntiForgeryToken]
public ActionResult Transfer()
{
            // password sending logic will be here
            return Content(Request.Form["amount"] + 
                " has been transferred to account " 
                + Request.Form["account"]);
}

Second in the HTML UI screen call “@Html.AntiForgeryToken()” to generate the token.

So now henceforth when any untrusted source send a request to the server it would give the below forgery error.

If you do a view source of the HTML you would find the below verification token hidden field with the secret key.

Tuesday, May 19, 2015

How to handle multiple Submit button issues in ASP.NET MVC? (MVC Interview Questions)

How to handle multiple Submit button issues in ASP.NET MVC? (MVC Interview Questions)

Let us understand the above problem in more detail.

Take a scenario where you have a view with two submit buttons as shown in the below code.

In the above code when the end user clicks on any of the submit buttons it will make a HTTP POST to “Action1”.

The question from the interviewer is: -

“What if we have want that on “Submit1” button click it should invoke “Action1” and on the “Submit2” button click it should invoke “Action2”.”

There are three basic approaches to solve the above problem scenario.

HTML way: -

In the HTML way we need to create two forms and place the “Submit” button inside each of the forms. And every form’s action will point to different / respective actions. You can see the below code the first form is posting to “Action1” and the second form will post to “Action2” depending on which “Submit” button is clicked.

AJAX way: -

In case you are an AJAX lover this second option would excite you more. In the Ajax way we can create two different functions “Fun1” and “Fun1”, see the below code. These functions will make Ajax calls by using JQUERY or any other framework. Each of these functions is binded with the “Submit” button’s “OnClick” events. Each of these function make call to respective action names.

Using “ActionNameSelectorAttribute”: -

This is a great and a clean option. The “ActionNameSelectorAttribute” is a simple attribute class where we can write decision making logic which will decide which action can be executed.

So the first thing is in HTML we need to put proper name’s to the submit buttons for identifying them on the server.

You can see we have put “Save” and “Delete” to the button names. Also you can notice in the action we have just put controller name “Customer” and not a particular action name. We expect the action name will be decide by “ActionNameSelectorAttribute”.

So when the submit button is clicked, it first hits the “ActionNameSelector” attribute and then depending on which submit is fired it invokes the appropriate action.

So the first step is to create a class which inherits from “ActionNameSelectorAttribute” class. In this class we have created a simple property “Name”.

We also need to override the “IsValidName” function which returns true or flase. This function is where we write the logic whether an action has to be executed or not. So if this function returns true then the action is executed or else it is not.

public class SubmitButtonSelector : ActionNameSelectorAttribute
    {
        public string Name { get; set; }
        public override bool IsValidName(ControllerContext controllerContext, string actionName, System.Reflection.MethodInfo methodInfo)
        {
            // Try to find out if the name exists in the data sent from form
var value = controllerContext.Controller.ValueProvider.GetValue(Name);
            if (value != null)
            {
                return true;
            }
            return false;

        }
    }

The main heart of the above function is in the below code. The “ValueProvider” collection has all the data that has been posted from the form. So it first looks up the “Name” value and if its found in the HTTP request it returns true or else it returns false.

var value = controllerContext.Controller.ValueProvider.GetValue(Name);
if (value != null)
      {
 return true;
      }
      return false;

This attribute class can then decorated on the respective action and the respective “Name” value can be provided. So if the submit is hitting this action and if the name matches of the HTML submit button name it then executes the action further or else it does not.

public class CustomerController : Controller
{
        [SubmitButtonSelector(Name="Save")]
        public ActionResult Save()
        {
            return Content("Save Called");
        }
        [SubmitButtonSelector(Name = "Delete")]
        public ActionResult Delete()
        {
            return Content("Delete Called");
        }
}

Monday, May 11, 2015

Validation’s using C# “DataAnnotation”

Introduction
How to use “DataAnnotations” ?
Step 1:- Refer System.ComponentModel.DataAnnotations
Step 2:- Decorate the class with attributes
Step 3:- Call the “Validator” for validation.

Introduction

Validations are one of the most important aspects of any software application. Normally as a best practice we put these validation’s in the business class , model etc. So if you normally see the trend, developers end up writing these validations in the “set” method of the class property.

 
public class Customer
    {

        private string _CustomerName;
        public string CustomerName
        {
            get { return _CustomerName; }
            set 
            {
                if (value.Length == 0)
                {
                    throw new Exception("Customer Name is required");
                }
                _CustomerName = value; 
            }
        }    
    }

“DataAnnotation” gives you ready made attributes which you can decorate on the class properties and the validation will be applied accordingly.

[Required]
public string CustomerName
{
            get { return _CustomerName; }
            set {_CustomerName = value; }
}

How to use “DataAnnotations” ?


Step 1:- Refer System.ComponentModel.DataAnnotations

The first step is to add reference to “System.ComponentModel.DataAnnotations” assembly to your class library project.

Step 2:- Decorate the class with attributes

The next step is to decorate the class with validation attributes. For instance on the “CustomerName” property we have decorated the “Required” attribute.

public class Customer
{
        private string _CustomerName;

        [Required]
        public string CustomerName
        {
            get { return _CustomerName; }
            set {_CustomerName = value; }
        }
        
}

Step 3:- Call the “Validator” for validation.

Once the validation attributes are decorated we need to call the “Validator” class to do the validations. Create the customer object and set the “CustomerName” property to nothing , so validation errors fire up.

Customer obj = new Customer();
obj.CustomerName = "";

Use the above created object to create the “ValidationContext” object.

var context = new ValidationContext(obj,null,null);

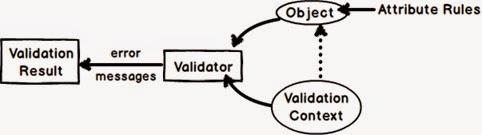
Use “Validator” to call  “TryValidateObject” method to run the validations. The validation errors get collected in the “ValidationResult” collection.

var result = new List();
var isValid = Validator.TryValidateObject(obj, context, result,true);

If you wish to loop through the error results you can run a “foreach” on the “result” collection.

foreach (var str in result)
{
Console.WriteLine(str.ErrorMessage.ToString());
}

Below is a pictorial representation of the above code. In simple words the object to be validated is passed to the “validator” class with the context and the error results come out in “ValidationResult” collection.

FYI :- If you have multiple validation do not forget to make the last property true.

var isValid = Validator.TryValidateObject(obj, context, result,true);