ASP.NET authentication and authorization
Introduction
Authentication and Authorization
Detecting authentication and authorization: - The principal and identity objects
Types of authentication and authorization in ASP.NET
Windows Authentication
Forms Authentication
- Forms authentication using ‘web.config’ as a data store
- Forms Authentication using SQL server as a data store
- Forms authentication using ASP.NET Membership and role
- The dual combination
- Forms Authentication using Single Sign on
Passport AuthenticationReferences
Introduction
This article will discuss how to implement ASP.NET authentication and authorization. This article initially starts with authentication and authorization concepts and later explains the three important ways of doing authentication and authorization i.e. windows, forms and passport. As the article moves ahead it explains basic, digest and integrated authentication in depth. This article also dives in depth on how forms authentication can be used to implement custom authentication and single-sign on authentication. One of the important concepts this article touch bases is ticket generation in cookies and how ASP.NET membership and role can help us to increase productivity.
This is a small Ebook for all my .NET friends which covers topics like WCF,WPF,WWF,Ajax,Core .NET,SQL etc you can download the same from
here or else you can catch me on my daily free training @
from here
Authentication and Authorization
Before proceeding ahead we need to understand four important vocabularies which you will see in this article again and again: - authentication, authorization, principal and identity. Let’s first start with authentication and authorization. If you search in www.google.com for the dictionary meaning of authentication and authorization, you will land up with something below:-
Authentication: - prove genuineness
Authorization: - process of granting approval or permission on resources.
The same dictionary meaning applies to ASP.NET as well. In ASP.NET authentication means to identify the user or in other words its nothing but to validate that he exists in your database and he is the proper user.
Authorization means does he have access to a particular resource on the IIS website. A resource can be an ASP.NET web page, media files (MP4, GIF, JPEG etc), compressed file (ZIP, RAR) etc.
So the first process which happens is authentication and then authorization. Below is a simple graphical representation of authentication and authorization. So when the user enters ‘userid’ and ‘password’ he is first authenticated and identified by the user name.
Now when the user starts accessing resources like pages, images, videos etc, he is checked whether he has the necessary access for the resources. The process of identifying the rights for resources is termed as ‘Authorization’.

To put it in simple words to identify “he is shiv” is authentication and to identify that “Shiv is admin” is authorization.
Detecting authentication and authorization: - The principal and identity objects
At any moment of time if you want to know who the user is and what kind of authentication type he using you can use the identity object. If you want to know what kind of roles it’s associated with then we need to use the principal object. In other words to get authentication details we need to the identity object and to know about authorization details of that identity we need the principal object.

For instance below is a simple sample code which shows how to use identity and principal object to display name and check roles.
Response.Write(User.Identity.Name +"<br>");
Response.Write(User.Identity.AuthenticationType + "<br>");
Response.Write(User.Identity.IsAuthenticated + "<br>");
Response.Write(User.IsInRole("Administrators") + "<br>");
Now if you run this code in IIS under anonymous mode it will display no details as shown below.

If you run the above code in IIS using some authentication mode like one shown below “Basic authentication” it will show all the details as shown below.

Types of authentication and authorization in ASP.NET
There are three ways of doing authentication and authorization in ASP.NET:-
• Windows authentication: - In this methodology ASP.NET web pages will use local windows users and groups to authenticate and authorize resources.
• Forms Authentication: - This is a cookie based authentication where username and password are stored on client machines as cookie files or they are sent through URL for every request. Form-based authentication presents the user with an HTML-based Web page that prompts the user for credentials.
• Passport authentication :- Passport authentication is based on the passport website provided
by the Microsoft .So when user logins with credentials it will be reached to the passport website ( i.e. hotmail,devhood,windows live etc) where authentication will happen. If Authentication is successful it will return a token to your website.
• Anonymous access: - If you do not want any kind of authentication then you will go for Anonymous access.
GenericPrincipal and GenericIdentity objects represent users who have been authenticated using Forms authentication or other custom authentication mechanisms. With these objects, the role list is obtained in a custom manner, typically from a database.
FormsIdentity and PassportIdentity objects represent users who have been authenticated with Forms and Passport authentication respectively.
Windows Authentication
When you configure your ASP.NET application as windows authentication it will use local windows user and groups to do authentication and authorization for your ASP.NET pages. Below is a simple snap shot which shows my windows users and roles on my computer.
5 steps to enable authentication and authorization using Windows
We will do a small sample to get a grasp of how authentication and authorization works with windows. We will create 2 users one ‘Administrator’ and other a simple user with name ‘Shiv’. We will create two simple ASPX pages ‘User.aspx’ page and ‘Admin.aspx’ page. ‘Administrator’ user will have access to both ‘Admin.aspx’ and ‘User.aspx’ page , while user ‘Shiv’ will only have access to ‘User.aspx’ page.

Step 1:- Creation of web site.
The next step is to create a simple web site with 3 pages (User.aspx, Admin.aspx and Home.aspx) as shown below.

Step 2:- Create user in the windows directory
The next step is we go to the windows directory and create two users. You can see in my computer we have ‘Administrator’ and ‘Shiv’.

Step 3:- Setup the ‘web.config’ file
In ‘web.config’ file set the authentication mode to ‘Windows’ as shown in the below code snippets.
<authentication mode="Windows"/>
We also need to ensure that all users are denied except authorized users. The below code snippet inside the authorization tag that all users are denied. ‘?’
indicates any
unknown user.
<authorization>
<deny users="?"/>
</authorization>
Step 4:- Setup authorization
We also need to specify the authorization part. We need to insert the below snippet in the ‘web.config’ file stating that only ‘Administrator’ users will have access to
‘Admin.aspx’ pages.
<location path="Admin.aspx">
<system.web>
<authorization>
<allow roles="questpon-srize2\Administrator"/>
<deny users="*"/>
</authorization>
</system.web>
</location>
Step 5:-Configure IIS settings
The next step is to compile the project and upload the same on an IIS virtual directory. On the IIS virtual directory we need to ensure to remove anonymous access and check the integrated windows authentication as shown in the below figure.

Now if you run the web application you will be popped with a userid and password box as shown below.

Once you enter credentials you should be able to see home.aspx as shown below.

In case you are not an administrator (i.e in this case its ‘shiv’) and you navigate to ‘Admin.aspx’ it will throw an error as shown in the below figure.

In case you want to read who the user is and with what authorization rights has he logged in you can use ‘WindowsPrincipal’ and ‘WindowsIdentity’. These two objects represent users who have been authenticated with Windows authentication. You can also get the roles these users have.
Different methods of collecting username and password
In the above step by step article you must have noticed the below options on IIS (Integrated, digest and basic). These three checkboxes decide how the windows username and password credentials are passed from the client desktop to the IIS.There are three different way of passing the windows username and password to IIS:-
• Basic
• Digest
• Windows
In the coming session we will understand in depth what these 3 options are.

Basic Authentication
When basic authentication is selected the ‘userid’ and ‘password’ are passed by using Base64 encoded format . i.e. why the name is basic authentication. ‘Base64’ is a encoding and not encryption. So it’s very easy to crack. You can read more about ‘Base64’ encoding at http://en.wikipedia.org/wiki/Base64 . Its a very weak form of protection.


Below is a small demonstration how easy it is to crack a basic authentication. You can see in the below figure we have checked ‘Basicauthentication’ check and we ran the fiddler tool to see the data.

We then copied the ‘Authorization:Basic’ data and ran the below program. LOL, we can see our windows userid and password.

Below is the code snippet of how to decode ‘Base64’ encoding.
public static string DecodeFrom64(string encodedData)
{

byte[] encodedDataAsBytes = System.Convert.FromBase64String(encodedData);

string returnValue = System.Text.Encoding.ASCII.GetString(encodedDataAsBytes);

return returnValue;}
Base64 is an encoding mechanism and not encryption
Basic authentication in other words ‘Base64’ encoding is used to transmit binary data and convert them to text so that they can run over the network. Some protocols may interpret your binary data as control characters. For instance the FTP protocol for certain combination of binary characters can interpret the same as FTP line endings.
At the end of the days it’s not an encryption algorithm it’s an encoding mechanism. That’s why in our previous section we demonstrated how easy it was to decode basic authentication.
Digest Authentication
The problem associated with basic authentication is solved by using digest authentication. We saw in our previous section how easy it was to crack basic authentication. Digest authentication transfers data over wire as MD5 hash or message digest. This hash or digest is difficult to dechiper.
In other words digest authentication replaces the lame basic authentication.

Said and done there one of the big problems of digest authentication is it’s not supported on some browsers.
Integrated Authentication
Integrated Windows authentication (formerly called NTLM, and also known as Windows NT Challenge/Response authentication) uses either Kerberos v5 authentication or NTLM authentication, depending upon the client and server configuration.
(The above paragraph is ripped from http://msdn.microsoft.com/enus/library/ff647076.aspx ).
Let’s try to understand what NTLM and Kerberos authentication is all about and then we will try to understand other aspects of integrated authentication.
NTLM is a challenge response authentication protocol. Below is how the sequence of events happens:-
• Client sends the username and password to the server.
• Server sends a challenge.
• Client responds to the challenge with 24 byte result.
• Servers checks if the response is properly computed by contacting the domain controller.
• If everything is proper it grants the request.

Kerberos is a multi-hounded (3 heads) who guards the gates of hades. In the same way Kerberos security has 3 participants authenticating service, service server and ticket granting server. Let’s try to understand step by step how these 3 entities participate to ensure security.

Courtesy: - http://24-timepass.com/postimg/three-headed-dog.jpg
Kerberos uses symmetric key for authentication and authorization. Below is how the things work for Kerberos:-
• In step 1 client sends the username and password to AS (Authenticating service).
• AS authenticates the user and ensures that he is an authenticated user.
• AS then asks the TGT (Ticket granting service) to create a ticket for the user.
• This ticket will be used to verify if the user is authenticated or not. In other words in further client interaction no password will be sent during interaction.

Order of Precedence
One of the things which you must have noticed is that integrated, digest and basic authentication are check boxes. In other words we can check all the three at one moment of time. If you check all the 3 options at one moment of time depending on browser security support one of the above methods will take precedence.
Let’s understand how the security precedence works as per browser security.
• Browser makes a request; it sends the first request as Anonymous. In other words it does not send any credentials.
• If the server does not accept Anonymous IIS responds with an "Access Denied" error message and sends a list of the authentication types that are supported by the browser.
• If Windows NT Challenge/Response is the only one supported method then the browser must support this method to communicate with the server. Otherwise, it cannot negotiate with the server and the user receives an "Access Denied" error message.
• If Basic is the only supported method, then a dialog box appears in the browser to get the credentials, and then passes these credentials to the server. It attempts to send these credentials up to three times. If these all fail, the browser is not connected to the server.
• If both Basic and Windows NT Challenge/Response are supported, the browser determines which method is used. If the browser supports Windows NT Challenge/Response, it uses this method and does not fall back to Basic. If Windows NT Challenge/Response is not supported, the browser uses Basic.
You can read more about precedence from http://support.microsoft.com/kb/264921.
In order words the precedence is:-
1. Windows NT challenge ( Integrated security)
2. Digest
3. Basic
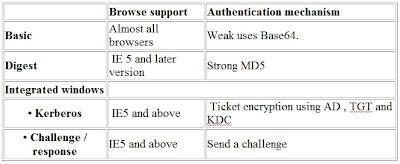
Comparison of Basic, digest and windows authentication.

Forms Authentication
Forms authentication is a cookie/URL based authentication where username and password are stored on client machines as cookie files or they are sent encrypted on the URL for every request if cookies are not supported.
Below are the various steps which happen in forms authentication:-
• Step 1:- User enters “userid” and “password” through a custom login screen developed for authentication and authorization.
• Step 2:- A check is made to ensure that the user is valid. The user can be validated from ‘web.config’ files, SQL Server, customer database, windows active directory and various other kinds of data sources.
• Step 3:- If the user is valid then a cookie text file is generated on the client end. This cookie test file signifies that the user has been authenticated. Hence forth when the client computer browses other resources of your ASP.NET site the validation is not conducted again. The cookie file indicates that the user has logged in.

Forms authentication using ‘web.config’ as a data store
So let’s understand step by step how to configure forms authentication. As said in the previous sections you can store user in ‘web.config’ files. Definitely it’s not the best way to store user in “web.config” files but it will really help us to understand forms authentication. Once we understand the same we can then move ahead to better improvised versions of forms authentication.
Step 1:- The first thing we need to do is make an entry in to the web.config file with authentication mode as forms as shown below. We need to also provide the following things :-
• LoginUrl :- This property helps us to provide the start page of authentication and authorization.
• defaultUrl :- Once the user is validated he will be redirected to this value , currently its “Home.aspx”.
• Cookieless :- As said previously forms authentication uses cookies. There are four ways by which you can change this behavior :-
oAutoDetect: - Depending on your browser configuration it can either use cookies or pass the authentication information encrypted via browser URL.
o UseCookies: - You would like the forms authentication mechanism to create cookie when the authentication is successful.
o UseURI :- You would like to pass data encrypted via the browser URL query string.
o UseDeviceProfile :- This is the default value. When you set this value the forms authentication mechanism will do look up at
“C:\WINDOWS\Microsoft.NET\Framework\v2.0.50727\CONFIG\Browsers” to see if the browser support cookies and then decides whether it should use cookies or should not. In other words it does not check on actual runtime if the browser has cookies enabled.
• Credentials: - In the credentials tag we have also some users with name and password. As said previously we will first use forms authentication with username’s stored in web.config files.
<authentication mode="Forms">
<forms loginUrl="Login.aspx" timeout="30" defaultUrl="Home.aspx" cookieless="AutoDetect">
<credentials passwordFormat="Clear">
<user name="Shiv" password="pass@123"/>
<user name="Raju" password="pass@123"/>
</credentials>
</forms>
</authentication>
Different customization values for ‘cookieless’ property.

If you set the cookieless as ‘UseDeviceProfile” it will use the browser data from the below file. You can see how Ericsson browser does not support cookies. So if any one connects with ericsson browser and the value is ‘UseDeviceProfile” , forms authentication will pass data through query strings.

Step 2:- Once you have set the “forms” tag values , it’s time to ensure that anonymous users are not able to browse your site. You can set the same by using the authorization tag as shown in the below code snippet.
<authorization>
<deny users="?"/>
</authorization>
Step 3:- We also need to define which user have access to which page. In this project we have created two pages “Admin.aspx” and “User.aspx”.
“Admin.aspx” is accessible to only user “Shiv” while “Admin.aspx” and “User.aspx” is accessible to both the users.
Below web.config settings show how we can set the user to pages.
<location path="Admin.aspx">
<system.web>
<authorization>
<allow users="Shiv"/>
<deny users="*"/>
</authorization>
</system.web>
</location>
<location path="User.aspx">
<system.web>
<authorization>
<allow users="Shiv"/>
<allow users="Raju"/>
<deny users="*"/>
</authorization>
</system.web>
</location>
Step 4 :- We now create our custom page which will accept userid and password.

In the button click we provide the below code. The “FormsAuthentication.Authenticate” looks in the web.config the username and passwords. The “FormsAuthentication.RedirectFromLoginPage” creates cookies at the browser end.

If you run your application , enter proper credentials , you should be able to see a cookie txt file created as shown in the below figure.

If you disable cookies using the browser settings, credentials will be passed via query string as shown in the below figure.


Forms Authentication using SQL server as a data store
In order to do custom authentication you need to need to just replace “FormsAuthentication.Authenticate” statement with your validation. For instance in the below code we have used ‘clsUser’ class to do authentication but we have yet used the cookie creation mechanism provided by ‘FormAuthentication’ system.
clsUser objUser = new clsUser();
if (objUser.IsValid(txtUser.Text,txtPass.Text))
{
FormsAuthentication.RedirectFromLoginPage(txtUser.Text, true);
}
Forms authentication using ASP.NET Membership and role
We have used forms authentication mechanism to generate cookie which has minimized lot of our development effort. Many other tasks we are still performing like:-
• Creation of user and roles tables.
• Code level implementation for maintaining those tables.
• User interface for userid and password.
We are sure you must have done the above task for every project again and again. Good news!!! All the above things are now made simple with introduction of membership and roles. To implement ASP.NET membership and roles we need to do the following steps :-
• Run aspnet_regsql.exe from ‘C:\WINDOWS\Microsoft.NET\Framework\v2.0.50727’ folder. Enter SQL Server credentials and run the exe. This will install all the necessary stored procedures and tables as shown in figure ‘Object created by aspnet_regsql.exe’

• Specify the connection string in the ‘web.config’ file where your ASP.NET roles tables and stored procedures are created.
<connectionStrings>
<remove name="LocalSqlServer1"/>
<add name="LocalSqlServer1" connectionString="Data Source=localhost;Initial Catalog=test;Integrated Security=True"/>
</connectionStrings>
• Specify the ASP.NET membership provider and connect the same with the connection string provided in the previous step.
<membership>
<providers>
<remove name="AspNetSqlMembershipProvider"/>
<add name="AspNetSqlMembershipProvider" type="System.Web.Security.SqlMembershipProvider, System.Web, Version=2.0.0.0, Culture=neutral, PublicKeyToken=b03f5f7f11d50a3a" connectionStringName="LocalSqlServer1" enablePasswordRetrieval="false" enablePasswordReset="true" applicationName="/" minRequiredPasswordLength="7"/>

</providers>
</membership>
• We also need to specify the role provider and connect the same with the connection string provided in the previous session.
<roleManager enabled="true">
<providers>
<clear/>
<add name="AspNetSqlRoleProvider" connectionStringName="LocalSqlServer1" applicationName="/" type="System.Web.Security.SqlRoleProvider, System.Web, Version=2.0.0.0, Culture=neutral, PublicKeyToken=b03f5f7f11d50a3a"/>
</providers>
</roleManager>
Now you can use the “Membership” class to create users and roles as shown in the below 2 figures.


You can get a feel how easy it is to use develop authentication and authorization by using forms authentication and ASP.NET membership and roles.
The dual combination
Authentication and authorization in any application needs 2 things:-
• Mechanism by which you can generate a cookie: - Provided by Forms authentication.
• Custom tables in SQL Server to store user and roles: - Provided by ASP.NET provider and roles.
In other words by using the combination of ticket generation via forms authentication and ASP.NET provider and roles we can come up with a neat and quick solution to implement authentication and authorization in ASP.NET applications.
Forms Authentication using Single Sign on
Many time we would like to implement single sign on across multiple sites. This can be done using forms authentication. You can implement forms authentication in both the websites with same machine key. Once the validation is done in one website a cookie text file will be created. When that user goes to the other website the same cookie file will used to ensure that the user is
proper or not.
Please note you need to have same machine key in both the web.config files of your web application.
<machineKey
validationKey="C50B3C89CB21F4F1422FF158A5B42D0E8DB8CB5CDA1742572A487D9401E340
0267682B202B746511891C1BAF47F8D25C07F6C39A104696DB51F17C529AD3CABE"
decryptionKey="8A9BE8FD67AF6979E7D20198CFEA50DD3D3799C77AF2B72F"
validation="SHA1" />
You can see a very detail article on Single sign at http://msdn.microsoft.com/en-us/library/ms972971.aspx . You can also download the code from
http://download.microsoft.com/download/B/7/8/B78D1CED-2275-4AEE-B0BE0DEA1A2A9581/MSDNEnterpriseSecurity.msi
The above discusses how a internal intranet and internet application login through one single sign-on facility.

The above diagram is taken from
http://msdn.microsoft.com/en-us/library/ms972971.aspx
Passport Authentication
Passport authentication is based on the passport website provided by the Microsoft .So when user logins with credentials it will be reached to the passport website ( i.e. hotmail,devhood,windows live etc) where authentication will happen. If Authentication is successful it will return a token to your website.I am leaving this section for now, will update in more details soon
References
Single sign on in sub domain
http://www.codeproject.com/KB/aspnet/SingleSignon.aspx
Great reference on different authentication mechanism
http://msdn.microsoft.com/en-us/library/ee817643.aspx
MSDN article which explains how to do forms authentication
http://support.microsoft.com/kb/301240
MSND article which explains identity and principal objects
http://msdn.microsoft.com/en-us/library/ftx85f8x(v=VS.85).aspx
Patterns and practices page which provides a table that illustrate range of IIS authentication settings. http://msdn.microsoft.com/en-us/library/ff649264.aspx
Order of precedence for Windows authentication, basic authentication and digest authentication http://support.microsoft.com/kb/264921
Nice article on Forms authentication which goes in depth
http://www.4guysfromrolla.com/webtech/110701-1.shtml
Forms authentication explained with nice sequence diagrams
http://www.asp.net/security/tutorials/an-overview-of-forms-authentication-vb
Nice PDF of best practices for forms authentication
http://www.foundstone.com/us/resources/whitepapers/aspnetformsauthentication.pdf
1 comment:
I would like to exchange links with your site computerauthor.blogspot.com
Is this possible?
Post a Comment