Showing posts with label WCF Training. Show all posts

Wednesday, November 16, 2011

WCF interview questions: - Using which binding we can build WCF REST?

This is one of the asked WCF interview questions during the interview. So one proceed answer as the following: -

For WCF REST we need to use WebHttpBinding. WebhttpBinding is enabled by as shown in the below code snippet.


Also see our following video on explanation of REST: -


Click and get to see more on WCF Interview questions series.

Regards,

Also visit author’s blog for more WCF interview questions

Thursday, September 8, 2011

WCF interview questions: - What is the difference between WCF and Web services?

• WCF services can be hosted in multiple protocols like http, TCP etc. Web
services can only be hosted on Http protocol.

• WCF has COM+ so you can call two different WCF services in a transaction, we
can not call two different web services in one transaction.

• WCF integrates with MSMQ, for web services we will need to write code.

In simple words below equation shows the difference with simple equation.

WCF = Web services + Remoting + MSMQ + COM+
Web service = WCF – (Remoting + MSMQ + COM+ )

Watch video on that How Can we do WCF Concurrency and throttling: -


Get more materials on WCF interview questions

Regards,

See more stuffs on author’s blog for WCF interview questions

Monday, June 27, 2011

WCF interview questions - What are 3 ways of implementing WCF(Windows Communication Foundation) concurrency?

Answer:

Three ways by which you can handle concurrency in WCF is Single, multiple and reentrant. To specify WCF concurrency we need to use the ‘ServiceBehavior’ tag as shown below with appropriate ‘ConCurrencyMode’ property value.

Figure:
Single: - A single request has access to the WCF service object at a given moment of time. So only one request will be processed at any given moment of time. The other requests have to wait until the request processed by the WCF service is not completed.

Multiple: - In this scenario multiple requests can be handled by the WCF service object at any given moment of time. In other words request are processed at the same time by spawning multiple threads on the WCFserver object. So you have great a throughput here but you need to ensure concurrency issues related to WCF server objects.
Reentrant: - A single request thread has access to the WCF service object, but the thread can exit the WCF service to call another WCF service or can also call WCF client through callback and reenter without deadlock.

You can also view video on WCF one way contract as follows: -


Please click here to see more .NET and WCF interview questions
Regards,

Visit Authors blog for more .NET and WCF interview Question

Wednesday, April 27, 2011

WCF Interview Question - What are the ways to do security in WCF?

Answer:

In WCF there are two types of Security, transport level security and message level security.
Transport Security: Transport level security happens at the channel level. Transport level security is the easiest to implement as it happens at the communication level. WCF uses transport protocols like TCP, HTTP, MSMQ etc and every of these protocols have their own security mechanisms. One of the common implementation of transport level security is HTTPS. HTTPS is implemented over HTTP protocols with SSL providing the security mechanism. No coding change is required it’s more of using the existing security mechanism provided by the
protocol.
Message Security: Message level security is implemented with message data itself. Due to this it is independent of the protocol. Some of the common ways of implementing message level security is by encrypting data using some standard encryption algorithm.
Below Diagram illustrate the concept of security in WCF.


Please click here to see more WCF interview questions
Regards,
Visit Authors blog for more WCF interviewquestion

Tuesday, April 26, 2011

WCF Interview Question - What is the differenceWCF Interview Question - What is the difference between Basic httpbinding and WShttpbinding?

Answer:
Basic Httpbinding:In httpbinding Data is sent as a plain text.In other words,there is no security provided for the message when the client calls happen.

This is aimed for clients who do not have .NET 3.0 installed and it supports wider ranges of clients. Many of the clients like Windows 2000 still do not run .NET 3.0. So older version of .NET can consume this service.

It uses SOAP1.1 version.
WShttpbinding:As WsHttBinding supports WS-*, it has WS-Security enabled by default. So the data is not sent in plain text.

As its built using WS-* specifications, it does not support wider ranges of client and it cannot be consumed by older .NET version less than 3 version.
It uses SOAP 1.2 and WS-Addressing specification.
Regards,
Please click here to see more WCF interview questions

Thursday, April 21, 2011

WCF Interview Question - Define WCF?

Answer:

WCF is a unification technology, which unites the following technologies:-
1.NET remoting

2.MSMQ

3.Web services

4.COM+.
Below figure depicts WCF fundamentals pictorially.


Please click here to see more WCF interview questions

Regards,

Visit Authors blog for more WCF interview questions

Wednesday, April 20, 2011

WCF Interview Question - How will you define Service Contract,Operation Contract and Data Contract?

Answer:

Service Contract:-Service Contract is used to define the service name.
Operation Contract:-Operation contract defines the methods in the services.
Data Contract:-Data contract defines custom data types in the services.

Please click here to see more WCF interview questions
Regards,
Visit Authors blog for more WCF interview questions

Monday, April 18, 2011

WCF Interview Question - How do you do Self-Hosting?

Answer:
The following steps are followed to do Self-hosting.
Step1: //Create a URI to serve as the base address
// Address as well binding

Uri httpUrl = new Uri("http://localhost:8010/MyService/HelloWorld");
Step2: //Create ServiceHost

 ServiceHost host = new ServiceHost(typeof(ClassLibrary1.HelloWorldService),httpUrl);

Step3: //Add a service endpoint

host.AddServiceEndpoint(typeof(ClassLibrary1.IHelloWorldService) , new WSHttpBinding(), "");

Step4: //Enable metadata exchange

ServiceMetadataBehavior smb = new ServiceMetadataBehavior();
smb.HttpGetEnabled = true;         
host.Description.Behaviors.Add(smb);

Step5: //Start the Service

host.Open();

Step6:

Console.WriteLine("Service is host at " + DateTime.Now.ToString());        
Console.WriteLine("Host is running... Press <Enter> key to stop");         
Console.ReadLine();

Regards,
Please click here to see more WCF interview questions

Friday, December 17, 2010

25 important WCF interview questions

25 important WCF interview questions

This section will cover the most asked questions on WCF interview. So have a look on the following and do revise it when ever you go for the WCF interviewNormally WCF interviewer starts with.....


What are the important principles of SOA (Service oriented Architecture)?
What are ends, contract, address, and bindings?
Which specifications does WCF follow?
What are the main components of WCF?
Explain how Ends, Contract, Address, and Bindings are done in WCF?
What is a service class?
What is a service contract, operation contract and Data Contract?
What are the various ways of hosting a WCF service?
How do we host a WCF service in IIS?
What are the advantages of hosting WCF Services in IIS as compared to
self-hosting?

What are the major differences between services and Web services?
What is the difference WCF and Web services?
What are different bindings supported by WCF?
Which are the various programming approaches for WCF?
What is one-way operation?
Can you explain duplex contracts in WCF?
How can we host a service on two different protocols on a single server?
How can we use MSMQ bindings in WCF?
Can you explain transactions in WCF?
What different transaction isolation levels provided in WCF?
Can we do transactions using MSMQ?
Can we have two-way communications in MSMQ?
What are Volatile queues?
What are Dead letter queues?
What is a poison message?

So friends answering to above questions on WCF interview questions helped me to clear interview in front of the interviewer.

Friday, June 25, 2010

WCF Concurrency (Single, Multiple and Reentrant) and Throttling

Introduction and Goal
Pre-requisite
Why do we need concurrency in WCF?
WCF concurrency and instancing – two different things
Three types of WCF concurrency
By default WCF services are Single concurrency – Sample code demonstration
9 combinations of Instancing and Concurrency
Instance mode = Per Call and Concurrency = Single
Instance mode = per Call and Concurrency = Multiple
Instance mode = per session and Concurrency = single
Instance mode = per session and Concurrency = Multiple
Instance mode = Single and Concurrency = Single
Instance mode = Single and Concurrency = Multiple
Reentrant
Throttling behavior
Default values for WCF throttling
Reference

Introduction and Goal

In this article we will concentrate on WCF concurrency and throttling. We will first try to understand what are WCF concurrency and the 3 important types of WCF concurrency. We will then see a small sample of WCF concurrency with single and multiple. We will then go through 9 combinations of WCF concurrency and instancing. Finally we will try to understand how to configure throttling using WCF ‘web.config’ file.

This is a small Ebook for all my .NET friends which covers topics like WCF,WPF,WWF,Ajax,Core .NET,SQL,Design patterns , UML , Azure etc you can download the same from here or else you can catch me on my daily free training @ from here

Courtesy: - http://www.nassaulibrary.org/ncla/nclacler_files/LILC7.JPG

Pre-requisite


In order to understand WCF concurrency well, it’s important to understand concepts around WCF instancing. So before moving ahead with this article please do once read WCF instancing from here

Why do we need concurrency in WCF?


If you search on the web for the dictionary meaning of concurrency you will find the following definition:-
“Happening at the same time”

WCF concurrency helps us to configure how WCF service instances can serve multiple requests at the same time. You will need WCF concurrency for the below prime reasons, there can be other reasons as well but these stand out as important reasons:-

Increase through put: - Many times you want to increase the amount of work your WCF service instance does at any moment of time, in other words you would like to increase the through put. Throughput means how much work a given thing can do. By default WCF service handles only one request at given moment of time.

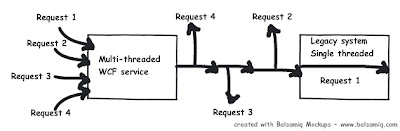
Integration with legacy system: - Many times your WCF services interact with legacy systems like VB6 COM etc. It’s very much possible that these systems are not multithreaded, in other words they handle only one request at any given moment of time. So even though your WCF service has concurrent capabilities you would like still to handle one request at a one time. This is achieved by using throttling in combination with WCF concurrency capabilities.
WCF concurrency and instancing – two different things

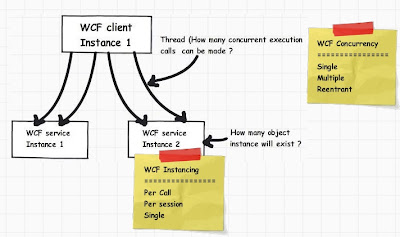
In our previous article we had discussed about WCF instances. WCF instancing and WCF concurrency are two different things. WCF instance dictates how the objects are created while WCF concurrency dictates how many requests can be handled by the WCF objects. I do understand that many of our developer’s friends know this difference, but as you go deeper in WCF concurrency there is lot of connection with WCF instancing also, so wanted to just emphasize the differences.

WCF instancing gives three levels of WCF object instance controls per call, per session and single. In case you are not aware of the same do read my article 3 way to do WCF instance management . In similar lines WCF concurrency also have 3 ways of implementing WCF concurrency.
Three types of WCF concurrency

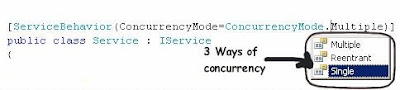
There are three ways by which you can handle concurrency in WCF Single, multiple and reentrant. To specify WCF concurrency we need to use the ‘ServiceBehavior’ tag as shown below with appropriate ‘ConCurrencyMode’ property value.

Single: - A single request has access to the WCF service object at a given moment of time. So only one request will be processed at any given moment of time. The other requests have to wait until the request processed by the WCF service is not completed.

Multiple: - In this scenario multiple requests can be handled by the WCF service object at any given moment of time. In other words request are processed at the same time by spawning multiple threads on the WCF server object.
So you have great a throughput here but you need to ensure concurrency issues related to WCF server objects.

Reentrant: - A single request thread has access to the WCF service object, but the thread can exit the WCF service to call another WCF service or can also call WCF client through callback and reenter without deadlock.


By default WCF services are Single concurrency – Sample code demonstration

By default WCF services are set to concurrency type ‘single’ and instancing mode ‘per call’. In order to demonstrate the same, let’s create a simple sample code as shown below. We will create a simple WCF service with a method name called as ‘Call’. When any client calls this WCF service it will display the
following details:-
• Client name that made the call. This value will be provided as an input when the client wants to make call to the WCF service.
• Instance number, this will represent number of WCF instance count which is serving the request.
• Thread number which is executing the method.
• Time when the ‘Call’ method was actually called.

Below is the service contract of the ‘Call’ method. Please note that the ‘OperationContract’ is defined as ‘IsOneWay’ true.
[ServiceContract]
public interface IHelloWorldService
{
[OperationContract(IsOneWay=true)]
void Call(string ClientName);
}
Below is the simple implementation of the service contract ‘IHelloWorldService’ interface defined below. It has a instance variable ‘i’ which helps us to maintain the instance counter and simple console.writeline which displays client name, instance number , thread number and time when the
method was called.
This method waits for 5 seconds using the ‘Thread.Sleep’ function.
public class HelloWorldService : IHelloWorldService
{
// maintain instance count
public int i;
public void Call(string ClientName)
{
// increment instance counts
i++;

// display client name, instance number , thread number and time when
// the method was called

Console.WriteLine("Client name :" + ClientName + " Instance:" + i.ToString() + " Thread:" + Thread.CurrentThread.ManagedThreadId.ToString() + " Time:" + DateTime.Now.ToString() + "\n\n");

// Wait for 5 seconds
Thread.Sleep(5000);
}}


This WCF service will be self hosted using ‘WsHttpBinding’ as shown below. We have chosen self hosting so that we can monitor the time, threads and number of
instances of WCF service.

static void Main(string[] args)
{
//Create a URI to serve as the base address
Uri httpUrl = new Uri("http://localhost:8010/MyService/HelloWorld");

//Create ServiceHost
ServiceHost host = new ServiceHost(typeof(ClassLibrary1.HelloWorldService), httpUrl);

//Add a service endpoint
host.AddServiceEndpoint(typeof(ClassLibrary1.IHelloWorldService), new WSHttpBinding(), "");

//Enable metadata exchange
ServiceMetadataBehavior smb = new ServiceMetadataBehavior();
smb.HttpGetEnabled = true;
host.Description.Behaviors.Add(smb);

//Start the Service
host.Open();

Console.WriteLine("Service is host at " + DateTime.Now.ToString());
Console.WriteLine("Host is running... Press <Enter> key to stop");
Console.ReadLine();
}


From the client side we will make 5 continuous calls simultaneously on the WCF service. Below is the code snippet for the same.
Console.WriteLine("Enter Client name");
string str = Console.ReadLine();
ServiceReference1.HelloWorldServiceClient obj = new ServiceReference1.HelloWorldServiceClient();

for(int i=0;i<5;i++)
{
obj.Call(str);
}

If you run the above project and monitor your WCF server service you will see the screen shot. There are 2 important points to note:-

• By default the WCF service is configure to run with instance mode of per call. So new instances are created every time the service runs. Instance 1, 2, 3 and 4 indicate new instances created for every method call.
• By default the concurrency is single so same thread is use to service all the 5 request’s which are sent from the WCF client side. You can see the value of the thread is always 4.
• The most important factor is time. As the concurrency is configured as single it will be called one after another sequentially. You can notice the same from the time difference of method call of 5 seconds.

Let’s go and change the concurrency mode to multiple. In order to change the concurrency mode to multiple we need to specify ‘Multiple’ in the concurrency mode as shown in the below code snippet.


If you run the client now you can see different threads (i.e. thread 4, 5, 6, 7 and 8) are spawned to serve the request and the time of the method calls are almost same. In other words the methods are executed concurrently on different threads.

In short you are now having higher throughput in less amount of time.

9 combinations of Instancing and Concurrency


There are 9 combination of concurrency and instancing methodology as shown in the below table. In the further coming section we will discuss in more detail about the same.

Instance mode = Per Call and Concurrency = Single
Instance mode ‘PerCall’ with ‘Single’ concurrency is the default setting in WCF. We have already seen and example and demonstration of the same.

With per call new WCF instances are created for every method calls made to the WCF server service. The default concurrency is single so only one thread will be used to serve all instances
Below is a simple pictorial representation of what will happen in per call and single concurrency scenario:-

• For every client instance a single thread will be allocated.
• For every method call a new service instance will be created.
• A single thread will be used to serve all WCF instances generated from a single client instance.
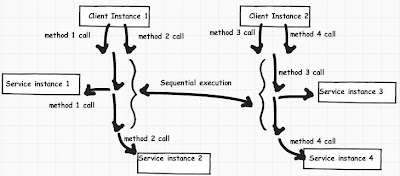


If you refer the previous sample you can see how threads are same and the halt of 5 seconds on the WCF service.


Instance mode = per Call and Concurrency = Multiple

[ServiceBehavior(InstanceContextMode=InstanceContextMode.PerCall, ConcurrencyMode = ConcurrencyMode.Multiple)]
public class HelloWorldService : IHelloWorldService
{
}


In this combination multiple instances are created for every call but multiple threads serve every method call to WCF service instance. You can see in
the below figure we have two WCF service instance and every instance has multiple WCF service objects created for every method call. Every method call is handled by multiple threads.

In the above sample if you remember we have multiple threads serving every method call and the time difference between every method call is reduced considerably. The method calls are fired approximately same time.

Instance mode = per session and Concurrency = single

[ServiceBehavior(InstanceContextMode=InstanceContextMode.PerSession, ConcurrencyMode = ConcurrencyMode.Single)]
public class HelloWorldService : IHelloWorldService
{
}


In this combination one WCF service instance is created for every WCF client session because the WCF instance mode is set to per session. All the method
calls are executed in a sequential manner one by one. In other words only one thread is available for all method calls for a particular service instance.

If you run the sample code with the per session and single combination mode you will find the same thread executes all request with same WCF instance per session.


Instance mode = per session and Concurrency = Multiple


[ServiceBehavior(InstanceContextMode=InstanceContextMode.PerSession, ConcurrencyMode = ConcurrencyMode.Multiple)]
public class HelloWorldService : IHelloWorldService
{
}


In this combination one WCF instance is created for every WCF client session and every method call is run over multiple threads. Below is the pictorial
representation of the same.


If you run the sample code attached with this article you will find same instance with every method call running on different methods.


To get a better idea you can run with different client exe instance with different names as shown below. You can notice how every client get his own WCF service instance with every method allocated to run on different threads.


Instance mode = Single and Concurrency = Single


[ServiceBehavior(InstanceContextMode=InstanceContextMode.Single, ConcurrencyMode = ConcurrencyMode.Single)]
public class HelloWorldService : IHelloWorldService
{
}

In this combination only one instance of WCF service instance is created which serves all requests which are sent from all WCF clients. These entire
requests are served using only one thread.
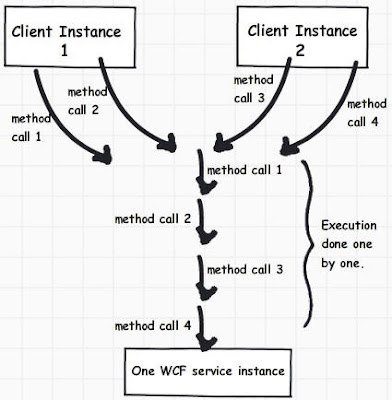
You can see in the below figure approximately one thread is assigned for every WCF client call and only one instance of the WCF service is created.

Instance mode = Single and Concurrency = Multiple

[ServiceBehavior(InstanceContextMode=InstanceContextMode.Single, ConcurrencyMode = ConcurrencyMode.Multiple)]
public class HelloWorldService : IHelloWorldService
{}

In this combination one WCF service instance is created for serve all WCF clients. All request are served using multiple / different threads.

You can see from the output we have 6 threads serving 10 requests as compared previously we had approximately only 2 threads.

Reentrant

In mode only thread runs to serve all requests. If your WCF service makes an outbound call to some other WCF service or makes a client call it releases the thread lock. In other words until the outbound call is completed other WCF clients can make call.


Throttling behavior


WCF throttling settings helps you to put an upper limit on number of concurrent calls, WCF instances and concurrent session. WCF provides 3 ways by which you can define upper limits MaxConcurrentCalls, MaxConcurrentInstances and MaxConcurrentSessions.

MaxConcurrentCalls: - Limits the number of concurrent requests that can be processed by WCF service instances.
MaxConcurrentInstances: - Limits the number of service instances that can be allocated at a given time. When it’s a PerCall services, this value matches the number of concurrent calls. For PerSession services, this value equals the number of active session instances. This setting doesn’t matter for Single instancing mode, because only one instance is ever created.
MaxConcurrentSessions: - Limits the number of active sessions allowed for the service.
All the above 3 setting can be defined in the ‘servicebehaviors’ tag as shown in the below XML snippet.

<serviceBehaviors>

<behavior name="serviceBehavior">

<serviceThrottling maxConcurrentCalls="16"

maxConcurrentInstances="2147483647" maxConcurrentSessions="10" />

</behavior>

</serviceBehaviors>


Default values for WCF throttling


Below is a simple table which shows default settings for throttling as per different WCF versions.



Reference
Nice information on throttling details by Mr. Kenny wolf http://kennyw.com/work/indigo/150

Nice article by Mr. Rick Rain in 3 parts which explains Concurrency and throttling in depth.
http://blogs.msdn.com/b/rickrain/archive/2009/06/15/wcf-instancing-concurrency-and-throttling-part-1.aspx


Mr. Michele Leroux Bustamante talks about settings which influence how throughput of WCF services can be increased using WCF concurrency.
http://www.windowsitpro.com/article/net-framework2/concurrency-and-throttling-configurations-for-wcf-services.aspx


Justin smith explains demonstrates a sample code on how ‘InstanceContextMode’ and ‘ConcurrencyMode’ property affects concurrency.
http://www.wintellect.com/CS/blogs/jsmith/archive/2006/05/16/instancecontextmode-and-concurrencymode.aspx


Mr. Glav talks about throttling and legacy system http://weblogs.asp.net/pglavich/archive/2007/06/27/wcf-and-concurrent-usage-throttling.aspx

Default values for WCF throttling
http://blogs.msdn.com/b/wenlong/archive/2009/07/26/wcf-4-higher-default-throttling-settings-for-wcf-services.aspx

Sunday, June 6, 2010

3 ways to do WCF instance management (Per call, Per session and Single)


Introduction
WCF service object instancing basics
Per Call instance mode
How to implement WCF per call instancing?
Per session Instance mode
How to implement per session Instancing?
Single Instance mode
How to implement Single Instance mode?
When should you use per call, per session and single mode?
Per call
Per session
Single
References

Introduction

Many times we would like to control the way WCF service objects are instantiated on WCF server. You would like to control how long the WCF instances should be residing on the server.

WCF framework has provided 3 ways by which we can control the WCF instance creation. In this article we will first try to understand those 3 ways of WCF service instance control with simple code samples of how to achieve them. Finally we will compare when to use under what situations.

This is a small Ebook for all my .NET friends which covers topics like WCF,WPF,WWF,Ajax,Core .NET,SQL etc you can download the same from http://tinyurl.com/4nvp9t or else you can catch me on my daily free training @ http://tinyurl.com/y4mbsn6

WCF service object instancing basics

In a normal WCF request and response communication following sequence of actions takes place:-
• WCF client makes a request to WCF service object.
• WCF service object is instantiated.
• WCF service instance serves the request and sends the response to the WCF client.

Following is the pictorial representation of how WCF request and response work.


Following are different ways by which you would like to create WCF instances:-
• You would like to create new WCF service instance on every WCF client method call.
• Only one WCF service instance should be created for every WCF client session.
• Only one global WCF service instance should be created for all WCF clients.
To meet the above scenarios WCF has provided 3 ways by which you can control WCF service instances:-
• Per Call
• Per session
• Single instance

Per Call instance mode

When we configure WCF service as per call, new service instances are created for every method call you make via WCF proxy client. Below image shows the same in a pictorial format:-

• WCF client makes first method call (method call 1).
• New WCF service instance is created on the server for this method call.
• WCF service serves the request and sends response and the WCF instance is destroyed and given to garbage collector for clean up.
• Now let’s say WCF client makes a second method call, again a new instance is created, request is served and the WCF instance is destroyed.

In other words for every WCF client method call one WCF service instance is created and destroyed once the request is served.


How to implement WCF per call instancing?

In order to specify instancing mode we need to provide ‘InstanceContextMode’ value in the ‘ServiceBehavior’ attribute as shown below. This attribute we need to specify on the ‘Service’ class. In the below code snippet we have specified ‘intCounter’ as a class level variable as shown below and the class counter is incremented by one when method ‘Increment’ is called.
[ServiceBehavior(InstanceContextMode = InstanceContextMode.Percall)]
public class Service : IService
{
private int intCounter;

public int Increment()
{
intCounter++
return intCounter;
}
}
At the client we have consumed the WCF client and we have called ‘Increment’ method twice.
ServiceReference1.ServiceClient obj = new ServiceReference1.ServiceClient();
MessageBox.Show(obj.Increment().ToString());
Even though we have called the ‘Increment’ method twice we get value ‘1’. In other words the WCF service instance is created for every method call made to the WCF service instance so the value will always be one.


Per session Instance mode


Many times we would like to maintain state between method calls or for a particular session. For those kind of scenarios we will need to configure the service as per session. In per session only one instance of WCF service object is created for a session interaction. Below figure explains the same in a pictorial format.

• Client creates the proxy of WCF service and makes method calls.
• One WCF service instance is created which serves the method response.
• Client makes one more method call in the same session.
• The same WCF service instance serves the method call.
• When client finishes his activity the WCF instance is destroyed and served to garbage collector for clean up.

How to implement per session Instancing?


To configure service as per session we need to configure ‘ServiceBehavior’ attribute with ‘PerSession’ value in the ‘InstanceContextMode’ object.
[ServiceBehavior(InstanceContextMode = InstanceContextMode.PerSession)]
public class Service : IService
{
private int intCounter;
public int Increment()
{
intCounter++
return intCounter;
}}


At the client side when we run the below client code. You should see the value as ‘2’ after the final client code is executed. We have called the method
twice so the value will be seen as two.
ServiceReference1.ServiceClient obj = new ServiceReference1.ServiceClient();
MessageBox.Show(obj.Increment().ToString());


Single Instance mode


Many times we would like to create one global WCF instance for all WCF clients. To create one single instance of WCF service we need to configure the WCF service as ‘Single’ instance mode. Below is a simple pictorial notation of how single instance mode will operate:-

• WCF client 1 requests a method call on WCF service.
• WCF service instance is created and the request is served. WCF service instance is not destroyed the service instance is persisted to server other requests.
• Now let’s say some other WCF client i.e. client 2 requests a method call.
• The same WCF instance which was created by WCF client 1 is used to serve the request of WCF client 2. In other words only one global WCF server service instance is created to serve all client requests.

How to implement Single Instance mode?

In order to create a single instance of WCF service we need to specify the‘InstanceContextMode’ as ‘Single’.

[ServiceBehavior(InstanceContextMode = InstanceContextMode.Single)]
public class Service : IService
{
}

If you call the WCF from different client you will see the counter keep incrementing. The counter has become a global variable.


When should you use per call, per session and single mode?


Per call


• You want a stateless services
• Your service hold intensive resources like connection object and huge memory
objects.
• Scalability is a prime requirement. You would like to have scale out
architecture.
• Your WCF functions are called in a single threaded model.

Per session


• You want to maintain states between WCF calls.
• You want ok with a Scale up architecture.
• Light resource references

Single


• You want share global data through your WCF service.
• Scalability is not a concern.

References


MSDN link for WCF instances
http://msdn.microsoft.com/en-us/library/ms733040.aspx

Do not miss this post which covers end to end about WCF sessions
http://codeidol.com/csharp/wcf/Instance-Management/

Great blog by Rick rain on WCF instancing
http://blogs.msdn.com/b/rickrain/archive/2009/06/15/wcf-instancing-concurrency-and-throttling-part-1.aspx

Thursday, May 20, 2010

6 steps to implement DUAL security on WCF using User name + SSL


Introduction and Goal
Basics Transport and Message level security
Step 1:- Customize ‘WsHttp’ Bindings with security mode and credential type
Step 2:- Create your custom validator class
Step 3:- Define runtime behavior
Step 4:- Define SSL for your WCF service
Step 5 :- Consume WCF Service
Step 6: Run your WCF service

Introduction and Goal

In the article we will try to apply DUAL security using transport plus message on WCF services. So we will first try to understand the basic concepts of WCF security i.e. transport and message. Once we understand the concept we will move step by step in to how to implement SSL and user name security on WCF services.
Watch my 500 videos on various topics like design patterns,WCF, WWF , WPF, LINQ ,Silverlight,UML, Sharepoint ,Azure,VSTS and lot more @ click here , you can
also view my WCF videos Part :-1 and Part:- 2
Enjoy my free ebook which covers major .NET related topics like WCF,WPF,WWF,Ajax,Core .NET,SQL Server, Architecture and lot more Download from here


Basics Transport and Message level security

On a broader basis WCF supports two kinds of security, transport level and message level security. Transport means the medium on which WCF data travels while message means the actual data packets sent by WCF. Transport medium can be protocols like TCP, HTTP, MSMQ etc. These transport mediums by themself provide security features like HTTP can have SSL security
(HTTPS). WCF has the capability of leveraging underlying transport security features on WCF service calls.

Message level security is provided in the data itself using WS-Security. In other words it’s independent of the transport protocol. Some examples of message level security are messages encrypted using encryption algorithm, messages encrypted using X509 certificate etc, messages protected using username etc.

WCF gives you an option to either just use message level security in stand alone, transport level in stand alone or combination of both. If you are interested in how to do message level security and transport security in a standalone manner you can read more from here.


The best security is the combination of transport and message. In this article we will see step by step how to implement dual security using ‘SSL’ plus message security using ‘Username’ using ‘WsHttpBinding’.

Step 1:- Customize ‘WsHttp’ Bindings with security mode and credential type

The first step is to customize your ‘Wshttp’ binding with proper security mode and credential type. There are three options in security mode ‘Transport’, ‘Message’ and ‘TransportWithMessageCredential’.

As we are implementing dual security we need to use the last one i.e. ‘TransportWithMessageCredential’ where the transport security is provided by SSL and message security is provided using ‘UserName and password’.


The second thing we need to provide is the credential type. There are five different credential type none, windows, username, certificate and issued token. Credential type defines how the credentials will be passed over the transport layer. For the current instance we will select ‘UserName’.


So summing up we will provide security mode as ‘TransportWithMessageCredential’ and message security will be provided by ‘UserName’.

So create a WCF service using the WCF service template and in ‘web.config’ provide the security mode and credential type as shown in the below code snippet.
<bindings>

<wsHttpBinding>

<binding name="Binding1">
<!-- UsernameToken over Transport Security -->

<security mode="TransportWithMessageCredential" >
<message clientCredentialType="UserName"/>

</security>

</binding>

</wsHttpBinding>

</bindings>


Step 2:- Create your custom validator class

Once we have customized the ‘WsHttp’ binding with security mode and credential type it’s time to create the custom class which will do authentication of the user name provided.

In order to create your custom class you need inherit the ‘UserNamePasswordValidator’ class which belongs to ‘System.IdentityModels.Selector’.


Below goes the code snippet of ‘MyValidator’ class. We need to override the ‘Validate’ method with the authentication logic as shown below.
class MyValidator : UserNamePasswordValidator
{

public override void Validate(string userName, string password)
{

if ((userName == "shiv123") && (password == "pass123"))
{

}
else
{
throw new FaultException("Invalid credentials");
}
}
}
If the credentials are not proper we have raised the ‘FaultException’ error which can be caught by the WCF client to display error messages.

Step 3:- Define runtime behavior


So we are almost 50% through now. We have customized the ‘WsHttp’ binding and created our custom class ‘MyValidator’ which will do the necessary authentication. The next step is to define behavior.

‘Behaviors’ define customized run time logic over the binding agreement. Currently we need to execute ‘MyValidator’ class logic for the ‘UserName’ provided in the WCF service by WCF client.


To specify the behavior go to your ‘Web.config’ file and in the ‘servicecredentials’ tag specify the ‘userNameAuthentication’ tag which points to the custom class ‘MyValidator’.
<behaviors>
<serviceBehaviors>

<serviceCredentials>

<userNameAuthentication userNamePasswordValidationMode="Custom" customUserNamePasswordValidatorType="MyValidator, app_code"/>

</serviceCredentials>
</behavior>

Step 4:- Define SSL for your WCF service


We have already mentioned transport security will be provided by SSL while message security will be provided by ‘username’. We have already configured ‘UserName’ message security using ‘MyValidator’ class which is specified in the behavior section of ‘web.config’ file. The next step is to configure SSL i.e. transport security for our WCF service.

We will be using ‘makecert.exe’ which is a free tool given by Microsoft to enable HTTPS for testing purpose. MakeCert (Makecert.exe) is a command-line tool that creates an X.509 certificate that is signed by a system test root key or by another specified key. The certificate binds a certificate name to the public part of the key pair. The certificate is saved to a file, a system certificate
store, or both.

You can get the same from “C:\Program Files\Microsoft Visual Studio 8\Common7\Tools\Bin” or you can also get it from windows SDK.

You can type the below thing through your dos prompt on “C:\Program Files\Microsoft Visual Studio 8\Common7\Tools\Bin”. Please note “compaq-jzp37md0” is the server name so you need to replace with your PC name.

makecert -r -pe -n "CN= compaq-jzp37md0 " -b 01/01/2000 -e 01/01/2050 -eku 1.3.6.1.5.5.7.3.1 -ss my -sr
localMachine -sky exchange -sp "Microsoft RSA SChannel Cryptographic Provider" -sy 12
If you run the same through your command prompt you should get a succeeded message as shown below.

Now it’s time to assign this certificate to your IIS website. So go to IIS properties, click on directory security tab and you should see server certificate tab.


So click on the server certificate tab and you will then be walked through an IIS certificate wizard. Click ‘Assign an existing certificate’ from the wizard.

You can see a list of certificates. The “compaq-jzp37md0” certificate is the one which we just created using ‘makecert.exe’.

Now try to test the site without ‘https’ and you will get an error as shown below….That means your certificate is working.

Do not forget to enable IIS anonymous access.

We also need to make couple of changes in the WCF service ‘Web.config’ ‘endpoint’ section as shown below. You can see how the address points to HTTPS and binding uses ‘mexHttpsBinding’.
<service name="Service" behaviorConfiguration="ServiceBehavior">

<endpoint address="https://localhost/Service.svc" binding="wsHttpBinding" contract="IService" bindingConfiguration="Binding1">

<endpoint address="mex" binding="mexHttpsBinding" contract="IMetadataExchange"/>

</service>

Step 5 :- Consume WCF Service

It’s time to consume WCF the service application. So click on add service reference and specify your service URL. You will be shown a warning box as shown in the below figure as the certificate is a test certificate. So just let it go.


The next step is to create WCF proxy client object and pass the credentials as shown in the below snippet.
ServicePointManager.ServerCertificateValidationCallback = new RemoteCertificateValidationCallback(IgnoreCertificateErrorHandler);
ServiceReference1.ServiceClient obj = new ServiceReference1.ServiceClient();
obj.ClientCredentials.UserName.UserName = "shiv123";
obj.ClientCredentials.UserName.Password = "pass123";
Response.Write(obj.GetData(12));
‘makecert.exe’ creates test certificates. In other words it’s not signed by CA. So we need to suppress those errors in our ASP.NET client consumer. So we have created a function called as ‘IgnoreCertificateErrorHandler’ which return true even if there are errors. This function is attached as a callback to ‘ServicePointManager.ServerCertificateValidationCallback’ as shown in the above
code snippet.
public static bool IgnoreCertificateErrorHandler(object sender, X509Certificate certificate, X509Chain chain, SslPolicyErrors sslPolicyErrors)
{
return true;
}


Step 6: Run your WCF service

If everything goes appropriate you should be able to run the WCF service. Try changing the use rid and password to something else you should get the fault exception message provided in the ‘MyValidtor’ class.

Sunday, March 14, 2010

4 steps to enable instrumentation in WCF

4 steps to enable instrumentation in WCF

Introduction and Goal

Many times we would like to monitor events of WCF application in production environment. We would like to monitor events like errors, security audits, performance etc. This can be achieved by extending the ASP.NET health monitoring system in WCF. The health monitoring system is also termed as instrumentation.
Here’s my small gift for all my .NET friends , a complete 400 pages FAQ Ebook which covers various .NET technologies like Azure , WCF , WWF , Silverlight , WPF , SharePoint and lot more http://tinyurl.com/4nvp9t

The event provider model

Instrumentation is provided using the event provider model. Events are notification which you receive from the WCF application which can be a security event like password change, UI click events, or exception events like application level errors. These events are captured by the provider and routed to some source like event viewer, SQL Server etc.


Both events and provider are specified in the ‘web.config’ file. The ‘eventmapping’ element is where you specify your provider and ‘rules’ elements helps you tie up the event with the provider.
<healthMonitoring>
<eventMappings>...</eventMappings>
<rules>...</rules>
</healthMonitoring>
What will we do in this article?
In this article we will create a simple audit function which will help us to track all calls made to the WCF service in to event viewer. So any calls by the
WCF client will be tracked and audited in to the event viewer. For every call we will be tracking details like number of threads, working sets, app domains, when
the message was created and when was it raised. Below is the snippet for the same which will be tracked in the event viewer.


***************start health monitoring event*******************
message created at:Event Created at :3/14/2010 11:32:37 AM
message raised at:Event Created at :3/14/2010 11:32:37 AM
Heap size 3480664
Number of threads 19
Number of Working sets 32165888
Number of domains 1
Request rejected 0******************End Health Monitoring event*********************

Step1: Create the main event class
The first step is to create a class which will help us to track the calls made to the WCF service. This class needs to be inherited from ‘WebAuditEvent’ class. This class helps us to track audit events, generate information about security related operation and provide both success and failure audit events.
using System;
using System.Collections.Generic;
using System.Linq;
using System.Text;
using System.Web.Management;
namespace healthmonitering
{
public class CustomAudit:WebAuditEvent
{
}
}

In the same class lets add 3 private fields ,’ msgcreated’ , ‘ msgraised’ and ‘WebProcessStatistics’. By using ’ msgcreated’ and ‘ msgraised’ we can track at what time event is
created and raised. ‘WebProcessStatistics’ will provide information for assessing the health of a running process.
private string msgcreated = string.Empty;
private string msgraised = string.Empty;
private static WebProcessStatistics processStatistics;


Implement the necesarry public constructors that call the protected equivalents in the parent WebAuditEvent class.Base keyword is used to access the member of
base class within the derived class as shown in the below code snippet. Note we have created the ‘WebProcessStatistics’ object and set it to the private member
variable.


public CustomAudit(string message, object eventsource, int eventcode)
: base(message, eventsource, eventcode)
{
msgcreated = string.Format("Event Created at :{0}", EventTime.ToString());
processStatistics = new WebProcessStatistics();
}

In both the constructors we are checking at what time event is created. Now override the Raise method as shown in the below code snippet.
public override void Raise()
{
msgraised = string.Format("Event Created at :{0}", EventTime.ToString());
base.Raise();
}

Override the ‘FormatCustomEventDetails’ method with the message we want to log in the eventviewer. Note, we have used ‘WebProcessStatistics’ to get information like Heap size,Number of threads,Number of Working sets,Number of domains and Request rejected.

public override void FormatCustomEventDetails(WebEventFormatter formatter)
{
formatter.AppendLine("");
formatter.IndentationLevel += 1;
formatter.AppendLine("***************start health monitoring event*******************");
formatter.AppendLine(string.Format("message created at:{0}",msgcreated));
formatter.AppendLine(string.Format("message raised at:{0}", msgraised));
formatter.AppendLine(string.Format("Heap size {0}", processStatistics.ManagedHeapSize.ToString()));
formatter.AppendLine(string.Format("Number of threads {0}", processStatistics.ThreadCount.ToString()));
formatter.AppendLine(string.Format("Number of Working sets {0}", processStatistics.WorkingSet.ToString()));
formatter.AppendLine(string.Format("Number of domains {0}", processStatistics.AppDomainCount.ToString()));
formatter.AppendLine(string.Format("Request rejected {0}", processStatistics.RequestsRejected.ToString())); ;
formatter.AppendLine("******************End Health Monitoring event*********************");
formatter.IndentationLevel -= 1;
}

In the Raise method, we are checking at what time event raised and in ‘FormatCustomEventDetails’ we are appending the result in the audit event.
Step2:- Create the WCF service and change web.config

namespace WcfService3
{
[ServiceContract]
public interface IService1
{
[OperationContract]
string Audit();
}
}


In the ‘Audit’ function We are going to implement our health monitering functionality in health operation contract.
In the Service1.svc.cs class implement the ‘Audit’ function by creating the ‘CustomAudit’ object and calling the ‘Raise’ function as shown in the below code snippet.

public class Service1 : IService1
{
public string Audit()
{
Healthmonitering.CustomAudit webevent = new Healthmonitering.CustomAudit("Some on called", this, WebEventCodes.WebExtendedBase + 1);
webevent.Raise();
return "Event Audited";
}
}


In the constructor we are sending message, eventsource and event code as a parameter.
Now go to the ‘web.config’ and under ‘system.web’ element and add the ‘healthmonitoring’ tag.
Specify ‘CustomAudit’ class in the ‘eventMappinga’ element and mapping of the class with event viewer in the ‘rules’ element tag as shown in the below code snippet.

<healthMonitoring>
<eventMappings>

<add name="healthmonitering" type="Healthmonitering.CustomAudit "/>
</eventMappings>
<rules>
<add name="healthmonitering" eventName="healthmonitering" provider="EventLogProvider" minInterval="00:00:01"/>

</rules>
</healthMonitoring>


Step 3 :- Consume the WCF service in the ASPX client.


So let’s add a ASPX button, consume the client service and call the ‘Audit’ function in the button click event as shown in below code snippets.
<asp:Button ID="Button1" runat="server" Text="Invoke" onclick="Button1_Click" />

Now in the button click event write these lines

protected void Button1_Click(object sender, EventArgs e)
{
ServiceReference1.Service1Client proxy = new WebApplication1.ServiceReference1.Service1Client();
string result = proxy.Audit();
Response.Write(result);
}

Here we are creating the proxy,invoking the ‘audit’ method and displaying the result of the ‘audit’ method.

Step 4 :- See the audit data in Eventviewer

Run the web application which is consuming the WCF service and press the button to invoke the WCF audit function.
The ‘Audit’ function internally calls the ‘Raise’ event which logs the message in an event viewer. So go to Start->run->type eventvwr.It contains information like Heap size,Number of threads,Number of Working sets,Number of domains and Request rejected as shown in the below figure.

Monday, February 1, 2010

Simple 5 steps to expose WCF services using REST style

Introduction
Video of this article
Step 1:- Create your WCF service project.
Step 2:- Make changes to the web.config files
Step 3:- Decorate your methods with ‘WebInvoke’ attribute.
Step 4:- Run your program.

Introduction


WCF Rest Services are nothing but simple WCF Services with added functionality
of consuming WCF service in a Restful manner. For instance if you had a order
web service that you built in WCF, instead of consuming them through heavy SOAP
implementation and ASMX, you can use the WCF Rest functionality to consume the
service by using simple HTTP verbs like post and get.
So rather than passing complicated SOAP message to the below link to get a order detail http://localhost/order.svc

We can now use REST style to get order as shown in the below URL
http://localhost/order.svc/GetOrder/100234

In this article we demonstrate the 4 important steps to enable your WCF service as a REST service.

Video of this article

In case you are lazy like me you can download the video of this article in MP4 format from http://tinyurl.com/y8j4jjb .

Step 1:- Create your WCF service project.

The first step is to create your WCF service. So click on new website and select WCF service template.


Step 2:- Make changes to the web.config files

The next step is to make changes in the Web.config files to ensure that its uses the HTTP verbs like post and get. So open the web.config file of your WCF project and change the binding to ‘webHttpBinding’ as shown in the below code snippet.
<endpoint address="" binding="webHttpBinding" contract="IService" behaviorConfiguration="WebBehavior1">

We also need to insert the ‘endpointBehaviors’ tag with ‘webHttp’ tag in the behavior tag as shown in the below code snippet.
<behaviors>
<endpointBehaviors>
<behavior name="WebBehavior1">
<webHttp/>
</behavior>
</endpointBehaviors>
</behaviors>


Step 3:- Decorate your methods with ‘WebInvoke’ attribute.

The next step is to decorate the function / method with ‘WebInvoke’ attribute as shown below. So decorate your function which you want to expose through REST using the ‘WebInvoke’ and specify the HTTP method which this function will accept, currently its ‘GET’.

We have also specified what kind of URI template will be used with the function. Currently we have specified the format as ‘Getdata/{value}’. In other words we can pass data as ‘GetData/1’, GetData/2’ etc.

using System.ServiceModel.Web;
[OperationContract]
[WebInvoke(Method = "GET",ResponseFormat = WebMessageFormat.Xml,
BodyStyle = WebMessageBodyStyle.Bare,
UriTemplate = "GetData/{value}")]
string GetData(string value);

Step 4:- Run your program.

Now run your program with URL as ‘http://localhost/WcfService3/Service.svc/GetData/12’ as shown in the below figure and it will display the data in the XML format as shown in the below figure.