7 simple steps to run your first Azure Queue program
Introduction
Azure queues help to communicate data between web role and worker role. Web roles are nothing but web application which can be accessed by the end browser. Worker roles are back ground processes which run in the azure system and they do not take direct request from the web.
So if we want to pass data to worker roles we need to use Queues. Queues are temporary storage which acts like a bridge between web role and worker role. So you can post data to web role , web role posts data to queues and worker role picks the data from queues to do further processing.
Please feel free to download my free 500 question and answer eBook which covers .NET , ASP.NET , SQL Server , WCF , WPF , WWF , Silver light , Azure @ http://tinyurl.com/4nvp9t .

What will we do in this article?
In this article we will create a simple application which will allow us to enter customer feedbacks. These customer feedback messages will go through a quality check whether the messages have any kind spam keywords. Currently we will only check for “XXX”.
In other words the above web role will submit the feedback message to queues, worker role will pick up the message, does a quality check and if the quality check passes it will add it to the Azure table. In case you are new to how to create an Azure table please read here http://computerauthor.blogspot.com/2010/01/9-simple-steps-to-run-your-first-azure.html
Step 1:- Ensure you have things at place
In case you are a complete fresher to Azure, please ensure you have all the pre-requisite at place. You can read the below article to get the basic prerequisite http://computerauthor.blogspot.com/2010/01/9-simple-steps-to-run-your-first-azure.html
Step 2:- Create a web role and worker project
The next step is to select the cloud service template, add the web role project and create your solution.

Step 3:- Configure service definition and configuration files.
The next step is to define table storage and queue storage location in the service definition and configuration. Just to revise service definition files help your define the configuration name while service configuration actually set the value.
Below is how the service definition file looks like , we need to the account name , shared key , queue storage and table storage end point. We need to define both these definition both for worker role as well as web role.
We are not sure if there is a way to avoid this redudancy. We googled and found that we indeed to define different definition even if the names are same , below is one of the links which talks about the same http://bstineman.spaces.live.com/Blog/cns!61AEA8168D26EA6B!291.entry
<?xml version="1.0" encoding="utf-8"?>
<ServiceDefinition name="QueueStorage" xmlns="http://schemas.microsoft.com/ServiceHosting/2008/10/ServiceDefinition">
<WebRole name="WebRole1" enableNativeCodeExecution="false">
<InputEndpoints>
<!-- Must use port 80 for http and port 443 for https when running in the cloud -->
<InputEndpoint name="HttpIn" protocol="http" port="80" />
</InputEndpoints>
<ConfigurationSettings>
<Setting name="AccountName" />
<Setting name="AccountSharedKey" />
<Setting name="QueueStorageEndpoint" />
<Setting name="TableStorageEndpoint" />
</ConfigurationSettings>
</WebRole>
<WorkerRole name="WorkerRole1" enableNativeCodeExecution="false">
<ConfigurationSettings>
<Setting name="AccountName" />
<Setting name="AccountSharedKey" />
<Setting name="QueueStorageEndpoint" />
<Setting name="TableStorageEndpoint" />
</ConfigurationSettings>
</WorkerRole>
</ServiceDefinition>
Once you have defined the definitions its time to define the configuration values for this definitions.Below is the service
configuration file which has the values for all the 4 definitions defined in the definition file. You can see that the end point for both storage and queues are defined using a URL , in other words these storages are exposed through REST services.
Currently all the 4 configurations point to the local development storage , these values will change when you want to host online on the actual azure platform.
<?xml version="1.0"?>
<ServiceConfiguration serviceName="QueueStorage" xmlns="http://schemas.microsoft.com/ServiceHosting/2008/10/ServiceConfiguration">
<Role name="WebRole1">
<Instances count="1" />
<ConfigurationSettings>
<Setting name="AccountName" value="devstoreaccount1" />
<Setting name="AccountSharedKey"
value="Eby8vdM02xNOcqFlqUwJPLlmEtlCDXJ1OUzFT50uSRZ6IFsuFq2UVErCz4I6tq/K1SZFPTOtr/KBHBeksoGMGw==" />
<Setting name="QueueStorageEndpoint" value="http://127.0.0.1:10001" />
<Setting name="TableStorageEndpoint" value="http://127.0.0.1:10002" />
</ConfigurationSettings>
</Role>
<Role name="WorkerRole1">
<Instances count="1" />
<ConfigurationSettings>
<Setting name="AccountName" value="devstoreaccount1" />
<Setting name="AccountSharedKey"
value="Eby8vdM02xNOcqFlqUwJPLlmEtlCDXJ1OUzFT50uSRZ6IFsuFq2UVErCz4I6tq/K1SZFPTOtr/KBHBeksoGMGw==" />
<Setting name="QueueStorageEndpoint" value="http://127.0.0.1:10001" />
<Setting name="TableStorageEndpoint" value="http://127.0.0.1:10002" />
</ConfigurationSettings>
</Role>
</ServiceConfiguration>
Step 4:- Add CustomerInfo entity class
The next step is to create our entity class which has customer name and message. So below is a simple entity class called as ‘CustomerInfo’ which inherits from ‘TableStorageEntity’. This class has 2 properties ‘CustomerName’ and ‘Message’.
public class CustomerInfo :
Microsoft.Samples.ServiceHosting.StorageClient.TableStorageEntity
{
public CustomerInfo()
{
this.PartitionKey = "CustomerInfos";
this.RowKey = DateTime.Now.Ticks.ToString();
}
public string CustomerName { get; set; }
public string Message { get; set; }
}
Step 5:- Add CustomerInfoDataContext class
We need to create one more class i.e. the data context class. This class is responsible for adding the above defined customer entity class. So the first thing is inherit from the ‘TableStorageDataServiceContext’ class as shown in the below code snippet.
public class CustomerInfoDataContext : TableStorageDataServiceContext
{}
In the same class we creat a initializetable method which will create the table structure define by the ‘CustomerInfo’ class.
Below is the code snippet explanation with comments.
public void InitializeTable()
{
// Get access to the account of table storage end point
StorageAccountInfo accountInfo =StorageAccountInfo.GetAccountInfoFromConfiguration("TableStorageEndpoint",true);

// Create the table using the ‘TableStorage’ class. TableStorage.CreateTablesFromModel(typeof(CustomerInfoDataContext), accountInfo);
}
We also need to expose ‘IQueryable’ interface which exposes ‘CustomerInfo’ class which can be used by Azure system to create
azure table structure.
public IQueryable<CustomerInfo> CustomerInfos
{
get
{
return this.CreateQuery<CustomerInfo>("CustomerInfos");
}
}
We are also exposing a ‘AddCustomer’ method which takes the ‘CustomerInfo’ object , this object is then added to the Azure
table using the ‘AddObject’ method of the ‘TableStorageDataServiceContext’ and finally for committing the same to the table we call the ‘SaveChanges’ method.
public void AddCustomer(CustomerInfo _objCustomer)
{
this.AddObject("CustomerInfos", _objCustomer);
this.SaveChanges();
}
Once we add the customer entity in to the table we would like to display the same , so we have exposed a ‘GetCustomerInfo’
function which is type casted to list and this can be binded to the grid view.
public List<CustomerInfo> GetCustomerInfo()
{

return this.CustomerInfos.ToList();
}
Step 6:- Create web role to add customer messages
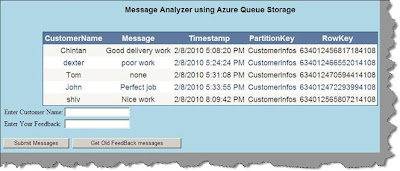
The next step is to create a web role project with a ASPX UI page as shown below. You can see that the UI has a gridview source which can be used to display messages and 2 text boxes for customer nameand feedback.

The submit messages button adds messages to the queue while the get old feedback messages displays the messages from the tables.
In order to add the customer and messages to the queue the first step is to get hold of the ‘StorageAccountInfo’ object using the configuration of the queues.
StorageAccountInfo accountQueueInfo = StorageAccountInfo.GetDefaultQueueStorageAccountFromConfiguration();
Use this account queue information to create the storage.
QueueStorage qs = QueueStorage.Create(accountQueueInfo);
Get the customer queue using the Queuestorage class.
MessageQueue queue = qs.GetQueue("customer");
Create the customer queue if it does not exist using the ‘DoesQueueExist’ method.
if (!queue.DoesQueueExist())
queue.CreateQueue();
Create the message object by concatentating both the text boxes and put the same in the queue.
Message msg = new Message(TextBox1.Text+"#"+TextBox3.Text);
queue.PutMessage(msg);We also have a second button on the web role screen to display the data added in the customer table. So below is the code which will help you display data from the azure table.Get hold of the ‘CustomerInfoDataContext’ class.
CustomerInfoDataContext
objCustomerDataContext = new CustomerInfoDataContext();
Use the ‘GetCustomerInfo’ function which was discussed in the previous steps to get a list of ‘CustomerInfo’ object.
List<CustomerInfo> _objCustomer = objCustomerDataContext.GetCustomerInfo();
Finnally bind the customer objects with the gridview.
if (_objCustomer.Count > 0)

{
GridView1.DataSource = _objCustomer;
GridView1.DataBind();
}
Step 7:- Create worker role to read the messages
In step 7 we have seen how the web role inserts data in to the queue. Now the queue is read by the worker role , the message is parsed and searched for ‘xxx’ , if its not found it will add the same to tables. So the first step is get hold of the queue object as shown in the below code snippet.
StorageAccountInfo accountQueueInfo = StorageAccountInfo.GetDefaultQueueStorageAccountFromConfiguration();
QueueStorage qs = QueueStorage.Create(accountQueueInfo);
MessageQueue queue = qs.GetQueue("customer");
In the worker there will be a infinite loop which will keep running and polling for messages using the queue objects which we just obtained from the above step.
while (true)
{
Message msg = queue.GetMessage();
if (msg != null)
{
// Parse XXX data here
}
}
In the while loop we get the message and checkfor ‘XXX” as shown in the below code snippet. If we do not find a ‘XXX’ we add
it to the table as entity using the data context object as shown in the below code snippet.
string message = msg.ContentAsString();
string name = message.Substring(0, message.IndexOf("#"));
string msgUser = message.Substring(message.IndexOf("#") + 1, message.Length - message.IndexOf("#") - 1);
if (!msgUser.Contains("xxx"))
{
CustomerInfo _obj = new CustomerInfo();
CustomerInfoDataContext objCustomerDataContext = new CustomerInfoDataContext();
_obj.CustomerName = name; _obj.Message = msgUser;
objCustomerDataContext.InitializeTable();
objCustomerDataContext.AddCustomer(_obj);
}
queue.DeleteMessage(msg);
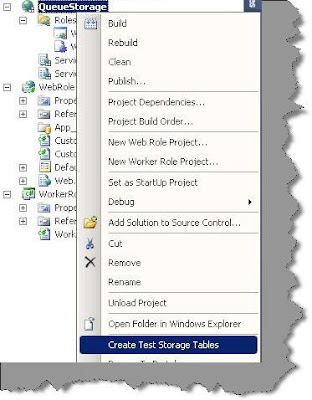
Now we are all set to run the program. Just toensure that all the tables are created , right click on the visual studio
project and select ‘Create test storage tables’ as shown below.
Enjoy your hard work. If you now add ‘XXX’ in the feedback message its not added to the table and rejected by the worker role.
If you add a normal message its displayed on the grid view source of the webrole project.
Source code
You can get the source code of the above sample from here.
string message = msg.ContentAsString();
string name = message.Substring(0, message.IndexOf("#"));
string msgUser = message.Substring(message.IndexOf("#") + 1, message.Length - message.IndexOf("#") - 1);
if (!msgUser.Contains("xxx"))
{
CustomerInfo _obj = new CustomerInfo();
CustomerInfoDataContext objCustomerDataContext = new CustomerInfoDataContext();
_obj.CustomerName = name; _obj.Message = msgUser;
objCustomerDataContext.InitializeTable();
objCustomerDataContext.AddCustomer(_obj);
}
queue.DeleteMessage(msg);
Now we are all set to run the program. Just toensure that all the tables are created , right click on the visual studio
project and select ‘Create test storage tables’ as shown below.

Enjoy your hard work. If you now add ‘XXX’ in the feedback message its not added to the table and rejected by the worker role. If you add a normal message its displayed on the grid view source of the webrole project.


