Tuesday, August 30, 2011

ASP.NET interview questions: - How to do Tracing in ASP.NET?

Tracing: - Tracing is a way to monitor the execution of yourASP.NET application. You can record exception details and program flow in a way that doesn't affect the program's output.
In simple words when you monitor your application during production or deployment phase is called Tracing.

Tracing can be done in the following ways.

1. Page level: - Enable tracing at page level display can be seen on browser.

2. Web.Config level: - Enable Tracing throughout the application.
Let’s see a simple example on how exactly we can achieve Tracing in your application.
In order to do tracing just follow the following steps.

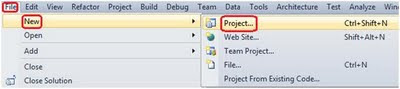
Step1: - create an ASP.NET Web Application for that just Go To > File >
New > Project > Web > ASP.NET Empty Web Application.


Now just add a form to the application for that just right click on the application > Add > Add New Item > Select Web Form.


Add three buttons on the WebForm.aspx page like below diagram.


Step2: - Add the below code snippet in WebForm1.aspx.cs page.

using System.Diagnostics;


namespace TracingApplication

{

public partial class WebForm1 : System.Web.UI.Page

{

Random obj = new Random();// created random object

int intRandom = 0;

protected void Page_Load(object sender, EventArgs e)

{

intRandom = obj.Next(5);// initialized value to the intRandom variable.

}


protected void Button1_Click(object sender, EventArgs e)

{

Trace.Warn("Button1 has been clicked");

}


protected void Button2_Click(object sender, EventArgs e)

{

Trace.Warn("Button2 has been clicked");

}


protected void Button3_Click(object sender, EventArgs e)

{

Trace.Warn("Button3 has been clicked");

}

}

}

Step3: - Now let’s see how you can achieve Page level Tracing.
ASP.NET tracing can be enabled on a page-by-page basis by adding "Trace=true" to the Page directive in any ASP.NET page:

<%@ Page Language="C#" Trace="true" AutoEventWireup="true"

CodeBehind="WebForm1.aspx.cs"

Inherits="TracingApplication.WebForm1" %>

Additionally, you can add the TraceMode attribute that sets SortByCategory or the default, SortByTime. You can use SortByTime to see the methods that take up the most CPU time for your application. You can enable tracing programmatically using the Trace.IsEnabled property.

Now, just run your application you will see output like below diagram.


Step4: - Now let’s see that how you can achieve Web.Config level Tracing.

You can enable tracing for the entire application by adding tracing settings in
web.config. In below example, pageOutput="false" and requestLimit="20"
are used, so trace information is stored for 20 requests, but not displayed on
the page because pageOutput attribute is set to false.

<configuration>

<appSettings/>

<connectionStrings/>

<system.web>

<compilation debug="false" />

<authentication mode="Windows" />

<trace enabled ="true" pageOutput ="false" requestLimit ="20"

traceMode ="SortByTime " />

</system.web>

</configuration>

Now what happened is all of your application pages are now enabled to tracing.
Step5: - Now let’s see what Trace.axd means.
Trace.axd: - Page output of tracing shows only the data collected for the current page request. However, if you want to collect detailed information for all the requests then we need to use Trace.axd. We can invoke Trace.axd tool for the application using the following URL http://localhost/application-name/trace.axd. Simply replace page name in URL with Trace.axd. That is, in our case. We should use following URL (Address bar) for our application as shown below.
Let’s see a simple demonstration on Trace.axd.
Just run your application and click on any one of the button and later in the url bar just replace the name like http://localhost1348/Trace.axd , will see the output like below diagram.


Now just click on the last view details and will see the tracing details like below diagram.


Also view the following video on ASP.NET Web.config transformation: -


Also see our tutorials on ASP.NET interview questions
Regards,
View more author’s blog on ASP.NET interview questions


Monday, August 29, 2011

SQL Server interview questions: - What is ACID fundamental? What are transactions in SQL SERVER?

A transaction is a sequence of operations performed as a single logical unit of work. A logical unit of work must exhibit four properties, called the ACID (Atomicity, Consistency, Isolation, and Durability) properties, to qualify as a transaction:
Atomicity

• A transaction must be an atomic unit of work; either all of its data modifications are performed or none of them is performed.

Consistency

• When completed, a transaction must leave all data in a consistent state. In a
relational database, all rules must be applied to the transaction's
modifications to maintain all data integrity.

Isolation

• Modifications made by concurrent transactions must be isolated from the
modifications made by any other concurrent transactions. A transaction either
see data in the state it was before another concurrent transaction modified it,
or it sees the data after the second transaction has completed, but it does not
see an intermediate state. This is referred to as serializability because it
results in the ability to reload the starting data and replay a series of
transactions to end up with the data in the same state it was in after the
original transactions were performed.

Durability

• After a transaction has completed, its effects are permanently in place in the
system. The modifications persist even in the event of a system failure.

View the video on optimistic locking as follows: -


Get our more tutorials on SQL server interview questions

Regards,

View author’s blog on SQL server interview questions


Saturday, August 27, 2011

SQL Server interview questions: - What are the different types of replication supported by SQL SERVER?

There are three types of replication supported by SQL SERVER:-

(a) Snapshot Replication.

Snapshot Replication takes snapshot of one database and moves it to the other
database. After initial load data can be refreshed periodically. The only
disadvantage of this type of replication is that all data has to be copied each
time the table is refreshed.

(b)Transactional Replication

In transactional replication, data is copied first time as in snapshot
replication, but later only the transactions are synchronized rather than
replicating the whole database. You can either specify to run continuously or on
periodic basis.

(c)Merge Replication.
Merge replication combines data from multiple sources into a single central
database. Again as usual, the initial load is like snapshot but later it allows
change of data both on subscriber and publisher, later when they come on-line it
detects and combines them and updates accordingly.

Also view video on the difference between Unique key and primary key: -


Get our more tutorials on SQL server interview questions

Regards,

View author’s blog on SQL server interview questions


Thursday, August 25, 2011

C# and .Net Interview Question:- What are InnerClass and how to use them?

InnerClass: - A class which is declared inside the body of another class is called as InnerClass.

Syntax: -

class Outer

{

//having it's own implementation.

class inner

{

//having its own implementation

}

}
Note:-
1. An inner class can access the static members of the containing outer class
without using that class name.

2. Another difference is when the inner class accesses an instance of the outer
class; it can access that object's private members even if they are not static.

There are many reasons to use InnerClass but the two important reasons are as
follows.

1. Organizing code into real world situations where there is a special
relationship between two objects.

2. Hiding a class within another class so that you do not want the inner class
to be used from outside of the class it is created within.

Let’s see small demonstration on how exactly InnerClass is declared or created.
Step1: - Create a new Project for that Go To > File > New > Project > Windows > Console Application.


Step2: - Create an inner class like below code snippet.

class MyClass

{

public void Method1()

{

Console.WriteLine("I am the MainClass");

}

class InnerClass1

{

public void Method1()

{

Console.WriteLine("I am the InnerClass");

}

}

}


The class InnerClass1 here is enclosed inside the declaration of class MyClass. InnerClass1 is thus a nested class. Because it has a public accessibility modifier, it can be accessed in places other than MyClass’s scope.
Step3: - let’s see how we access the above two classes in the main class.

static void Main(string[] args)

{

MyClass obj = new MyClass();

obj.Method1();

MyClass.InnerClass1 obj1 = new MyClass.InnerClass1();

obj1.Method1();

Console.ReadLine();

}

In the above code snippet you can see that in order to use the inner class I have created the instance like below code snippet.

MyClass.InnerClass1 obj1 = new MyClass.InnerClass1();


Now when you run your application you will see result like below diagram.


Also have a look on this video, which is asked in most of the interviews.


Please click here to see more C#/Dotnet interview questions

Regards,

Visit Authors blog for more Most asked Dotnet interview questions


Wednesday, August 24, 2011

.Net Interview Question:- Can we declare Interfaces as private?

Sometimes I am surprised with some questions which come up during .NET interview and this one is one of them. I really do not understand why people ask such questions and how useful it is practically.
Most of the developers jump to the conclusion and say “NO”.

Let me first prove that how the developer are also right by saying that
Interfaces cannot be declared as private and later we will see that how they are
also wrong(incorrect).

Now, let first declare an interface as private and try to compile it and see
that what the compiler says about it.

private interface I1

{


}


In the above diagram you can see that the compiler throws an error saying that Elements defined in a namespace cannot be explicitly declared as private.

Now, let’s prove the second point that interfaces can also be declared as
private.

In the below code snippet you will see that I have declared the interface as
private and try to build the solution, will see that what the compiler has to
say about it.

class MyClass

{

private interface I1

{

}

}


In above diagram you can see that now the compiler has successfully build
solution without throwing the error this means that we can declare Interfaces as
private also but the interfaces declared as private should be declared inside
the class.
Note: - To declare Interfaces as Private you need to declare it inside the class.

Following is the video which shows that how the questions are asked C# and .NET interviews.


Please click here to see more interview questions and answers for .NET

Regards,


Visit Authors blog for more Most asked Dotnet interview questions

Tuesday, August 23, 2011

.NET interview questions: - What is Native Image Generator (Ngen.exe)?

The Native Image Generator utility (Ngen.exe) allows you to run the JIT compiler on your assembly's MSIL and generate native machine code which is cached to disk. After the image is created .NET runtime will use the image to run the code rather than from the hard disk. Running Ngen.exe on an assembly potentially allows the assembly to load and execute faster, because it restores code and data structures from the native image cache rather than generating them dynamically.
Below are some points to be remembered for Native Image Generator:-

• Native images load faster than MSIL because JIT compilation and type-safety
verifications is eliminated.

• If you are sharing code between process Ngen.exe improves the performance significantly. As Native image generated Windows PE file so a single DLL file can be shared across applications. By contrast JIT produced code are private to an assembly and cannot be shared.

• Native images enable code sharing between processes.

• Native images require more storage space and more time to generate.

• Startup time performance improves lot. We can get considerable gains when
applications share component assemblies because after the first application has
been started the shared components are already loaded for subsequent
applications. If assemblies in an application must be loaded from the hard disk,
does not benefit as much from native images because the hard disk access time
shadows everything.

• Assemblies in GAC do not benefit from Native image generator as the loader
performs extra validation on the strong named assemblies thus shadowing the
benefits of Native Image Generator.

• If any of the assemblies change then Native image should also be updated.

• You should have administrative privilege for running Ngen.exe.

• While this can fasten, your application startup times as the code is
statically compiled but it can be somewhat slower than the code generated
dynamically by the JIT compiler. Therefore, you need to compare how the whole
application performance with Ngen.exe and with out it.

To run Ngen.exe, use the following command line.

ngen.exe install <assemblyname>

This will synchronously precompile the specified assembly and all of its dependencies. The generated native images are stored in the native image cache.
In .NET Framework 2.0 there is a service (.NET Runtime Optimization Service)
which can precompile managed assemblies in the background. You can schedule your
assemblies to be precompiled asynchronously by queuing them up with the NGEN
Service. Use the following command line.

Ngen.exe install <assemblyname> /queue :<priority>

Assemblies, which are critical to your application’s start up time, should be precompiled either synchronously or asynchronously with priority 1. Priority 1 and 2 assemblies are precompiled aggressively while Priority 3 assemblies are only precompiled during machine idle-time. Synchronously precompiling your critical assemblies guarantees that the native images will be available prior to the first time your end user launches the application but increases the time taken to run your application's set up program.
You can uninstall an assembly and its dependencies (if no other assemblies are dependent on them) from the native image cache by running the following command.

ngen.exe uninstall <assemblyname>

Native images created using Ngen.exe cannot be deployed; instead, they need to be created on the end user's machine. These commands therefore need to be issued as part of the application's setup program. Visual Studio .NET can be used to implement this behavior by defining custom actions in a Microsoft Installer (MSI) package.
Note:- One of the things the interviewer will expect to be answered is what
scenario will use a Native Image generator. Best is to say that we first need to
test the application performance with Native Image and with out it and then make
a decision. If we see that we have considerable performance difference we can
then use native image generator.


Related to interview, view the following video on mock of .NET interview questions


Get more tutorials for Dotnet interview questions and answers

Regards,

Also view author’s blog for Most asked Dotnet interview questions


Sunday, August 21, 2011

.Net Interview Question:- How to add your window application icon to the task bar?

This is not one of the .NET typical interview question but as a developer you would be interested in knowing that how to add your windows application icon in to the task bar.
Let’s demonstrate a simple example to see how exactly you can add your windows
application icon in the task bar.

In order to achieve the above subject just follow the following steps.

Step1: - create a windows application for that Go To > File >
New
> Project > Windows > Select Windows Forms Application.


Step2: - Now from the toolbox just add the “NotifyIcon” control to the main
form.


Step3: - Go to the properties of the NotifyIcon control and set the properties
like below diagram.


In the above diagram you can see that I have set the following properties.

BalloonTipIcon = Warning.

BalloonTipText = Click to enlarge.

BalloonTipTitle = Message.


Note
: - please select an icon with .ico extension with maximum size of48 * 48.
Step4: - Add a Button on the form and add the below code snippet in to
Form1.cs.

private void button1_Click(object sender, EventArgs e)

{

notifyIcon1.ShowBalloonTip(1);

this.Visible = false;

}

Once you have completed with all the above steps now just run your
application and will see that the selected application icon is now being added
to the task bar to the right bottom of your screen like below diagram.


In above diagram you can clearly see that now the application icon is being
added to the task bar.
Now, when you click on the Button1 you will see a message pops up like below diagram as we have declared to the properties of the NotifyIcon control.


Also view our video of C# interview questions on Garbage Collector as follows: -


Visit us for more tutorials on Most asked Dotnet interview questions

Regards,
Get more .Net / C# interview questions from author’s blog


Saturday, August 20, 2011

C# and .NET interview question - Can we implement interface with same method name in C#?

This is one of the typical .Net interview questions and is also the favorable question of interviewers.
Let’s first try to understand what exactly the question means.
Suppose we have two interfaces namely I1, I2 and both the interface have a single method with same name like below code snippet.
interface I1

{

void Method1();

}

interface I2

{

void Method1();

}
In above code snippet you can see that we have two interfaces with same method name.
Now, let’s create a class which inherits both interfaces I1, I2 and also do the
implementation like below code snippet.

class A : I1, I2

{

public void Method1()

{

Console.WriteLine("Who has Called me......");

}

}
In above code snippet you can see that I have implemented method only once.
Now let’s see if this compile or not.


You can see that the compile successfully, this means that we have not break any
of the rule.

Now, let invoke both the interfaces method in main class like below code
snippet.

static void Main(string[] args)

{

I1 obj1 = new A();

obj1.Method1();

I2 obj2 = new A();

obj2.Method1();

Console.ReadLine();

}
Now, just run the application and you will see result like below diagram.


The above code works fine but our concern is to have two different for both the
interfaces. So in order to achieve this we have to “ExplicitInterface
method implement.

Now, let’s see how exactly we can achieve this practically.

Step1: - create a new console application for that Go To> New > File >
Project > Windows > Select Console Application.


Step2: - create two interfaces like below code snippet.

interface I1

{

void Method1();

}

interface I2

{

void Method1();

}


Step3: - create a class which inherits both the interfaces and implement both the interfaces methods like below code snippet.
class A : I1,I2

{

void I1.Method1()

{

Console.WriteLine("I have been called by I1.......");

}


void I2.Method1()

{

Console.WriteLine("I have been called by I2.......");

}

}

In above code snippet you can see that I have used “ExplicitInterface” methodimplementation.
void I1.Method1()// here I1.Method1() will indicate the Interface I1.

void I2.Method1()// here I2.Method1() will indicate the Interface I2.

Step4: - now just invoke both the interfaces methods in the main class
like below code snippet.

static void Main(string[] args)

{

I1 obj1 = new A();

obj1.Method1();

I2 obj2 = new A();

obj2.Method1();

Console.ReadLine();

}

Once you have done with all the above steps now just run your application and you will see the result like below diagram.


Now from the above result you can see that both Interfaces methods are having
different implementations.

View the following video how can we implement interfaces with same method names
in C#: -


Also see our tutorials on interview questions and answers for Dotnet

Regards,

View more author’s blog on Most asked Dotnet interview questions


Friday, August 19, 2011

SQL Server interview questions: - How you can find the age of an Employee whose age is greater than 30?

This is one of the most typical questions asked in most of the interviews and is the favorable question of interviewers to check your skill on SQL.
Many of the developer fail to query this question and because of that they also
get rejected by the interviewers.

So, let’s demonstrate a simple example to see how exactly we can achieve the
above query in SQL.

Assume that we have the following table of Employee with their respective
fields, data types and data.


Now assuming the above table, we have to display the employee names whose age is
greater than 30.

In order to achieve the required result we have use SQL function called as “DATEDIFF”.

DATEDIFF: - Returns the count (signed integer) of the specified datepart
boundaries crossed between the specified startdate and enddate.

Syntax: -

DATEDIFF ( datepart , startdate , enddate )

Query: -

select Employees.EmployeeName, DATEDIFF(YEAR,EmployeeDOB,getdate())as Age

from Employees where DATEDIFF(YEAR,EmployeeDOB,getdate())>= 30
The above SQL query set will give output like below diagram.


Hence you can see that Employee names have been displayed whose age is greater
than 30.

View the following video on how to improve SQL Server performance using profiler
and tuning advisor


Visit for more SQL Server interview questions

Regards,

Also author’s blog for other SQL Server interview questions


.NET and c# interview questions :- Can we implement interfaces with same...

for more .net and c# interview questions videos click on  Dotnet and c# interview questions

Thursday, August 18, 2011

.NET interview questions: - Why are Anonymous Types better than Tuples?

Anonymous Type: - Anonymous Types help us to create an object without declaring its data type and also help us to create properties with good meaningful names. Since the name of the data type is not specified that the type is referred to as an Anonymous Type.
Tuples: - In simple words Tuple are nothing but they are objects which helps us to logically group other kind of objects inside.

A Tuple is a data structure that has a specific number and sequence of elements. An example of a tuple is a data structure with three elements (known as a 3-tuple or triple) that are used to store an identifier such as a person's name in the first element, a year in the second element, and the person's income for that year in the third element. The .NET Framework directly supports tuples with one to seven elements. In addition, you can create tuples of eight or more
elements by nesting tuple objects in the Rest property of a Tuple<T1, T2, T3, T4, T5, T6, T7, TRest> object.

Let’s first see in what kind of scenario we will use “Tuples” and “Anonymous Types”.

Suppose we have a simple string which has Customer’s, FirstName, MiddleName, LastName and PhoneNumber like below code snippet.

string str = "Feroz S Shaikh 966457"; // Here you can see that the Customer's Name and

Phone Number are Seperated by (‘ ’)spaces.
Now, you would like to parse the data and take the data in to individual variables like below code snippet.
string strFirstName = "";//this variable will hold Customer FirstName.

string strMiddleName = "";//this variable will hold Customer MiddleName.

string strLastName = "";//this variable will hold Customer LastName.

double PhoneNumber = 0;//this variable will hold Customer PhoneNumber.
In order to parse data into individual variables, we have to create a function with “Out” parameters and have to use “Split” function like below code snippet.
static void ParseData(string strData, out string strFirstName, out string strMiddleName,

out string strLastName, out double PhoneNumber)

{

string[] ArrayData = new string[3];//Created Array with Size 3.

ArrayData = strData.Split(' ');//Used Split function to split the data.


strFirstName = ArrayData[0];//Passed the data to strFirstName.

strMiddleName = ArrayData[1];//Passed the data to strMiddleName.

strLastName = ArrayData[2];//Passed the data to strLastName.

PhoneNumber = Convert.ToDouble(ArrayData[3]);//Passed the data to PhoneNumber.

}
Still now we have done with parsing the data.
Now just invoke this function from the main class like below code snippet.

ParseData(str, out strFirstName, out strMiddleName, out strLastName, out PhoneNumber);
Now, let just display the result for that just add the below code snippet.
Console.WriteLine("FirstName :" + strFirstName);

Console.WriteLine("MiddleName : " + strMiddleName);

Console.WriteLine("LastName : " + strLastName);

Console.WriteLine("PhoneNumber : " + PhoneNumber.ToString());

Console.ReadLine();
Let’s see how the result set look like.


Now, the above code is nice its work’s properly but the concern here is the code
tidiness, in current scenario all the variables are individual variables in case
if you want to parse the data around it would be very tedious job to do and it
would make your very lengthy and not be very easy to read.

The solution for the above code is that if you can club the individual variables
all together in to an object and use that object to pass the data anywhere you
want to that would bring down our code to a great extent.

So Tuples and Anonymous Types help us out to achieve the above
solution and make our code more readable and understandable.

Now, we will first see how exactly Tuples help in above scenario and what
is the drawback of using Tuples in the above scenario and later we will
see how Anonymous Types helps us to make your code better than using Tuples.

So, let see how Tuples helps to make code better in the above scenario.

Step1: - create a new project Console Application for that Go To > New >
File > Project > Windows > Select Console Application.


Step2
: - create a string variable containing data like below code snippet.

string str = "Feroz S Shaikh 966457";
Step3: - creating tuple like below code snippet.

static Tuple<string, string, string, double> ParseData(string strData)

//created tuple with three string data type and one double type.


{

string[] ArrayData = new string[3];//Created Array with Size 3.

ArrayData = strData.Split(' ');//Used Split function to split the data.

//assigned the data to the tuple object.

return Tuple.Create<string, string, string, double>

(ArrayData[0],

ArrayData[1],

ArrayData[2],

Convert.ToDouble(ArrayData[3]));

}
Step4: - Now receive the tuple in the main class like below code snippet and also display data.
var CustomerInformation = ParseData(str);//recieved the tuple.

//assigned the tuple data.

Console.WriteLine("FirstName :" + CustomerInformation.Item1);

Console.WriteLine("MiddleName : " + CustomerInformation.Item2);

Console.WriteLine("LastName : " + CustomerInformation.Item3);

Console.WriteLine("PhoneNumber : " + CustomerInformation.Item4);

Console.ReadLine();

In the above code snippet as soon as you click CustomerInformation(.)(dot)
the VS business intelligence will show like below diagram.


Now just run your application and will see the result like below diagram.


Now, let see what the negative point of using Tuples is.


In above diagram you can see that there is no way to identify that Item1
represent the FirstName, Item2 represent the MiddleName, Item3 represent the
LastName and Item4 represent the PhoneNumber. So clearly in terms of writing a
maintainable code this is not desirable.

If somehow we can change this Item1, Item2, Item3 and Item4 in to good
meaningful properties name like FirstName, MiddleName, LastName and PhoneNumber
than it would be much easy to understand the code in better manner. In this kind
of scenario Anonymous Types help us out.

Let’s see how exactly Anonymous Type help to solve the above problem for that
you just need to follow the following steps.

Step1: - create a new project Console Application for that Go To > New >
File > Project > Windows > Select Console Application.


Step2: - create a string variable containing data like below code snippet.

string str = "Feroz S Shaikh 966457";
Step3: - create an Anonymous Type like below code snippet.

static object ParseData(string strData)

{

string[] ArrayData = new string[3];//Created Array with Size 3.

ArrayData = strData.Split(' ');//Used Split function to split the data.

//Creating Anonymous Types on the fly.

return new {

FirstName = ArrayData[0],

MiddleName = ArrayData[1],

LastName = ArrayData[2],

PhoneNumber = Convert.ToDouble(ArrayData[3])};

}

In the above code snippet you can see that we have created an Anonymous Type with FirstName, MiddleName, LastName, PhoneNumber and this is getting type casted to object because we cannot return Anonymous Type object outside the function straight forward. We need to type caste it like below code snippet.

static T Cast<T>(object obj, T type)

{

return (T)obj;

}

Step4: - Now receive Anonymous Type in the main class like below code snippet and also display data.

var CustomerInformation = Cast(ParseData(str),new {FirstName="",MiddleName="",

LastName="",PhoneNumber=0});

//assigned the data.

Console.WriteLine("FirstName :" + CustomerInformation.FirstName);

Console.WriteLine("MiddleName : " + CustomerInformation.MiddleName);

Console.WriteLine("LastName : " + CustomerInformation.LastName);

Console.WriteLine("PhoneNumber : " + CustomerInformation.PhoneNumber);

Console.ReadLine();

In the above code snippet as soon as you type CustomerInformation(.)(dot) the VS business intelligence will show properties like below diagram.


Now, in the above diagram you can clearly see that Item1, Item2, Item3 and Item4
is now being completely replaced by good meaningful property names like
FirstName, MiddleName, LastName and PhoneNumber which become much easier to read
and understand the code.

Now just run your application and will see the result like below diagram.


Following view the video on “Why anonymous types are better than tuples?”


Also see our tutorials on important Dotnet interview questions

Regards,

View more author’s blog on Most asked Dotnet interview questions 

Wednesday, August 17, 2011

.NET interview questions: - What are Anonymous Type and when to use them?

Anonymous Type: - Anonymous Types help us to create an object without declaring its data type and also help us to create properties with good meaningful names. Since the name of the data type is not specified that the type is referred to as an Anonymous Type.
Let’s first see in what kind of scenario Anonymous Type are applicable.
Suppose we have a simple string which has Customer’s, FirstName, MiddleName, LastName and PhoneNumber like below code snippet.

string str = "Feroz S Shaikh 966457"; // Here you can see that the Customer's

Name and Phone Number are Seperated by (‘ ’)spaces.

Now, you would like to parse the data and take the data in to individual variables like below code snippet.

string strFirstName = "";//this variable will hold Customer FirstName.

string strMiddleName = "";//this variable will hold Customer MiddleName.

string strLastName = "";//this variable will hold Customer LastName.

double PhoneNumber = 0;//this variable will hold Customer PhoneNumber.

In order to parse data into individual variables, we have to create a function with “Out” parameters and have to use “Split” function like below code snippet.
static void ParseData(string strData, out string strFirstName, out string

strMiddleName, out string strLastName, out double PhoneNumber)

{

string[] ArrayData = new string[3];//Created Array with Size 3.

ArrayData = strData.Split(' ');//Used Split function to split the data.


strFirstName = ArrayData[0];//Passed the data to strFirstName.

strMiddleName = ArrayData[1];//Passed the data to strMiddleName.

strLastName = ArrayData[2];//Passed the data to strLastName.

PhoneNumber = Convert.ToDouble(ArrayData[3]);//Passed the data to PhoneNumber.

}

Still now we have done with parsing the data.
Now just invoke this function from the main class like below code snippet.
ParseData(str, out strFirstName, out strMiddleName, out strLastName, out PhoneNumber);


Now, let just display the result for that just add the below code snippet.

Console.WriteLine("FirstName :" + strFirstName);

Console.WriteLine("MiddleName : " + strMiddleName);

Console.WriteLine("LastName : " + strLastName);

Console.WriteLine("PhoneNumber : " + PhoneNumber.ToString());

Console.ReadLine();

Let’s see how the result set look like.


The above code is nice its work’s properly but the concern here is the code tidiness, in current scenario all the variables are individual variables in case if you want to parse the data around it would be very tedious job to do and it would make your code very lengthy and not be very easy to read.
So Anonymous Type helps to solve the above problem in simplified manner and making our code more readable and understandable.
Let’s see how exactly Anonymous Type help to solve the above problem for that you just need to follow the following steps.
Step1: - create a new project Console Application for that Go To > New
> File > Project > Windows > Select Console Application.


Step2
: - create a string variable containing data like below code snippet.

string str = "Feroz S Shaikh 966457";
Step3: - create an Anonymous Type like below code snippet.

static object ParseData(string strData)

{

string[] ArrayData = new string[3];//Created Array with Size 3.

ArrayData = strData.Split(' ');//Used Split function to split the data.

//Creating Anonymous Types on the fly.

return new {

FirstName = ArrayData[0],

MiddleName = ArrayData[1],

LastName = ArrayData[2],

PhoneNumber = Convert.ToDouble(ArrayData[3])};

}

In the above code snippet you can see that we have created an Anonymous Type
with FirstName, MiddleName, LastName, PhoneNumber and this is getting type
casted to object because we cannot return Anonymous Type object outside the
function straight forward. We need to type caste it like below code snippet.

static T Cast<T>(object obj, T type)

{

return (T)obj;

}

Step4: - Now receive Anonymous Type in the main class like below code snippet and also display.

var CustomerInformation = Cast(ParseData(str),new

{FirstName="",MiddleName="",LastName="",PhoneNumber=0});

//assigned the data.

Console.WriteLine("FirstName :" + CustomerInformation.FirstName);

Console.WriteLine("MiddleName : " + CustomerInformation.MiddleName);

Console.WriteLine("LastName : " + CustomerInformation.LastName);

Console.WriteLine("PhoneNumber : " + CustomerInformation.PhoneNumber);

Console.ReadLine();

In the above code snippet as soon as you type CustomerInformation(.)(dot) the VS business intelligence will show properties like below diagram.


Now just run your application and will see the result like below diagram.


Also view following video on why anonymous types are better than tuples.


Get our tutorials on interview questions and answers for .NET

Regards,

Visit for author’s more blog on Most asked Dotnet interview questions