Introduction
Validations are one of the most important aspects of any software application. Normally as a best practice we put these validation’s in the business class , model etc. So if you normally see the trend, developers end up writing these validations in the “set” method of the class property.
public class Customer
    {

        private string _CustomerName;
        public string CustomerName
        {
            get { return _CustomerName; }
            set
            {
                if (value.Length == 0)
                {
                    throw new Exception("Customer Name is required");
                }
                _CustomerName = value;
            }
        }
    }
“DataAnnotation” gives you ready made attributes which you can decorate on the class properties and the validation will be applied accordingly.
[Required]
public string CustomerName
{
            get { return _CustomerName; }
            set {_CustomerName = value; }
}
How to use “DataAnnotations” ?
Step 1:- Refer System.ComponentModel.DataAnnotations
The first step is to add reference to “System.ComponentModel.DataAnnotations” assembly to your class library project.
Step 2:- Decorate the class with attributes
The next step is to decorate the class with validation attributes. For instance on the “CustomerName” property we have decorated the “Required” attribute.
public class Customer
{
        private string _CustomerName;

        [Required]
        public string CustomerName
        {
            get { return _CustomerName; }
            set {_CustomerName = value; }
        }

}
Step 3:- Call the “Validator” for validation.
Once the validation attributes are decorated we need to call the “Validator” class to do the validations. Create the customer object and set the “CustomerName” property to nothing , so validation errors fire up.
Customer obj = new Customer();
obj.CustomerName = "";

Use the above created object to create the “ValidationContext” object.

var context = new ValidationContext(obj,null,null);

Use “Validator” to call  “TryValidateObject” method to run the validations. The validation errors get collected in the “ValidationResult” collection.

var result = new List();
var isValid = Validator.TryValidateObject(obj, context, result,true);
If you wish to loop through the error results you can run a “foreach” on the “result” collection.
foreach (var str in result)
{
Console.WriteLine(str.ErrorMessage.ToString());
}
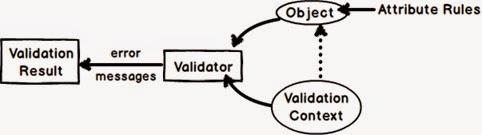
Below is a pictorial representation of the above code. In simple words the object to be validated is passed to the “validator” class with the context and the error results come out in “ValidationResult” collection.
FYI :- If you have multiple validation do not forget to make the last property true.
var isValid = Validator.TryValidateObject(obj, context, result,true);
No comments:
Post a Comment