Introduction
Validation is one of the most important parts in any software project. Building flexible business validation is every one’s dream. Rather than writing frameworks from scratch to do these things, Microsoft validation blocks makes it a breeze. In this article we will discuss how validation application blocks help us to build flexible validations using validation application blocks. Its just a simple sixteen step process to put our business validation in action using validation blocks.Please feel free to download my free 500 question and answer videos which covers Design Pattern, UML, Function Points, Enterprise ApplicationBlocks, OOP'S, SDLC, .NET, ASP.NET, SQL Server, WCF, WPF, WWF, SharePoint, LINQ,SilverLight, .NET Best Practices @ these videos http://www.questpond.com
16 steps to write flexible business validation in C# using Validation Blocks
- The problem
- The solution: - validation application blocks
No business can work without validation. Software’s are made to make business automated so validation forms the core aspect for any software. Almost 80% projects in .NET implement validation as shown in figure below.
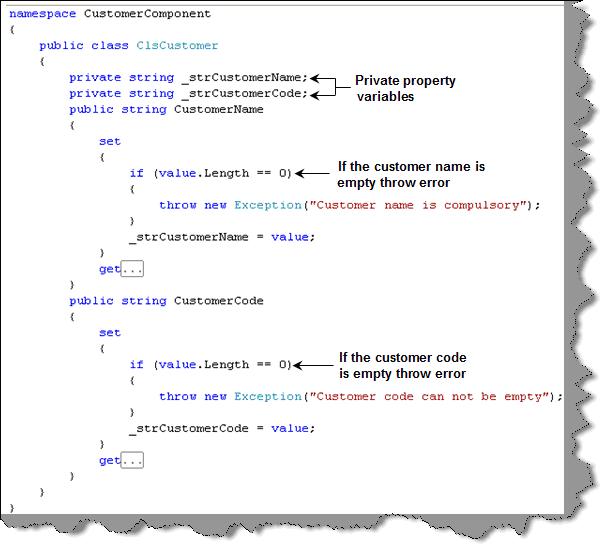
Figure: - Validation implemented
Now we can consume the class in the ASPX UI as shown in figure ‘Business object consumed’. We have created the object, set the properties and in case there is error we have caught the same and displayed it in a label using try catch exception blocks.
 Figure :- Business object consumed
This implementation looks good to some extent as we have put the business validation in the class and decoupled the UI from any business validation changes.
Let’s list down the common problems associated with the above methodology:-
Tangled validation: - If the validation rules changes we need to compile the whole class. As the entity and the validation layer are entangled in one class, changes in validation leads to compilation of the whole class. So out first goal should be decouple this validation logic from the entity class. When we say entity class we are referring to the ‘ClsCustomer’ class.
 Figure :- Tangled validation
 Figure :- Decoupling validations from the entity class
No need of compiling: - Validations are volatile entity. They change from time to time. If we can change validation constraints without compiling will lead to better maintenance of the system.
One go validation and results: - The second issue is validations are executed in every set of the property and errors are displayed one by one. It would be great if we can validate all the validation once and display all the errors once.
All these things can be achieved by using Microsoft validation application blocks.
The solution: - validation application blocks
Step 1:- Download the Enterprise library 4.0 from here.Step 2:- Once you install it you should see the same in programs – Microsoft patterns and practices.
Before we move ahead to understand how validation application blocks works. We will first walkthrough fundamentally how validation application blocks decouples the validation from the entity classes. Validation application blocks stands in between the entity class the validation. Validations are stored in configuration files like web.config or app.config depending whether it’s a web application or a windows application. So the validation blocks reads from the configuration file the rules and applies it over the entity class. We can maintain these validations using the enterprise configuration screen provided by Microsoft blocks.
 Figure: - Decoupling validations from entity classes
Now that we have understood how validation blocks will work. We will run through a example practically to understand the concept.
Step 3:- Once you have installed the block, click on Enterprise library configuration UI to define validation on the configuration file
 Figure :- Loading Enterprise configuration screen
Step 4:- Click on open and browse to your web.config file and click the open button.
 Figure :- Open the web.config file
Step 5:- Once you have opened the web.config file you should see a tree like structure as shown in figure ‘Add validation block’. Right click on the main tree and add the validation application block to your web.config file.

Figure :- Add validation application block
Step 6:- Once you have added the validation application block you should see a validation application block node. Right click on the node , select new and click the type menu. Figure: - Add the assembly type
Step 7:- Once you have clicked on the type menu you should see a dialog box as shown in figure ‘Load assembly’.
 Figure: - Load assembly
 Step 8:- Click on load assembly and browse to the assembly DLL to which you want to apply validations.
 Figure: - Browse the assembly
Step 9 :- Select the class in the assembly as shown in figure select class.

Figure :- Select class
 Figure: - Choose members
Step 11:- Once you have clicked the choose members menu you will be popped up with a property selector box as shown in figure ‘Select properties’. In the customer class we have two properties on which we want to apply validations one is the customer name and the other is the customer code. So we will select both the properties and click ok.
 Figure: - Choose properties
Step 12:- Once you have selected the properties you can see both the properties in the UI. To apply validation right click on let’s say customer code property. You will now see list of validations which you can apply on the property. This tutorial will not go in details about all the validations. If you are interested in the same you can read about it more on http://msdn.microsoft.com/en-us/library/cc309336.aspx . For the current scenario we will select range validator.
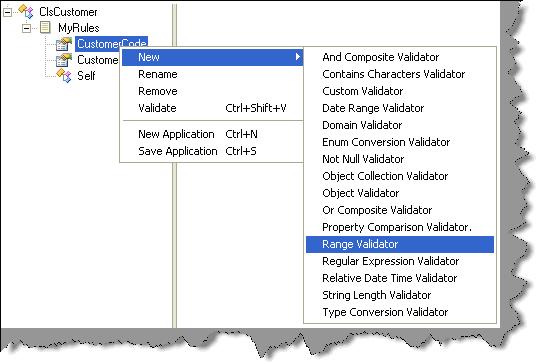
Figure: - Select range validator
 Figure: - Range validator properties
Step 14 :- In the default rule select the rule which you have just made. If it’s none validations will not fire.
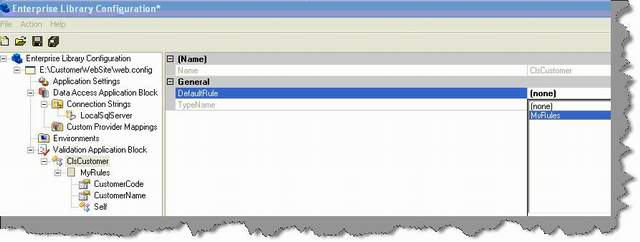
Figure: - Select rule
If you are done just save everything and watch your web.config which is now modified with the validation tags. You will see both the validation i.e. customer name and customer code in XML format inside the <validation> tag. The best part of the config file is now you can change the validation in the config file itself.You guessed right… no recompiling , no installation and completely decoupled. Figure: - Web.config with validation tags
Step 15:- Ok, now that we are done with putting the validation in the web.config file. Its time to write the code which will read from the config file and apply to our entity class. So the first thing we need to reference the validation application block in our assembly references and include the name spaces in our clsCustomer class.

Figure: - Reference validation application blocks


Figure: - Import the validation namespace
Step 16:- Once you are done with adding the namespaces its time to fire the validation. Below is the code snippet which shows how the validation application block fires the validation using the web.config file. First step create the customer object and set the property. In the second step we tell to the validation static class to validate the object. The validation static class returns validation results. This validation results are nothing but error failures in case the validation fails. In the final step we have looped through the validation results to display the error.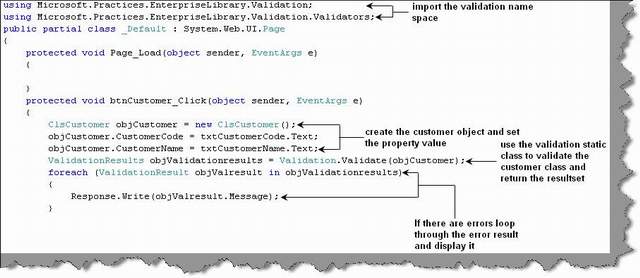
Figure: - The validation code
Ok, now that we are done its time to see the action. You can see in the UI we have just set empty properties and it showed me both the business validations errors from the collection. Figure :- Validation in action
No comments:
Post a Comment